Lexus ES: Removal
REMOVAL
CAUTION / NOTICE / HINT
NOTICE:
This procedure includes the removal of small-head bolts. Refer to Small-Head Bolts of Basic Repair Hint to identify the small-head bolts.
Click here .gif)
PROCEDURE
1. REMOVE FRONT FENDER APRON SEAL RH
Click here
2. REMOVE OIL PRESSURE CONTROL VALVE ASSEMBLY
| (a) Disconnect the oil pressure control valve assembly connector. |
|
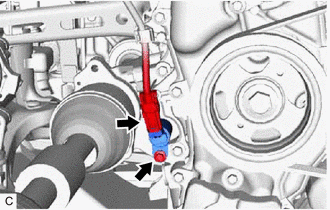
(b) Using an 8 mm socket wrench, remove the bolt and oil pressure control valve assembly from the timing chain cover assembly.
READ NEXT:
 Inspection
INSPECTION PROCEDURE 1. INSPECT OIL PRESSURE CONTROL VALVE ASSEMBLY (a) Measure the resistance according to the value(s) in the table below. Standard Resistance: Tester Connection Condition
Installation
INSTALLATION CAUTION / NOTICE / HINT NOTICE: This procedure includes the installation of small-head bolts. Refer to Small-Head Bolts of Basic Repair Hint to identify the small-head bolts. Click here
SEE MORE:
Installation
INSTALLATION CAUTION / NOTICE / HINT for HV Model:
When removing or installing the front disc brake caliper assembly, pushing back the disc brake piston may cause a large clearance between the brake pads and brake disc. When the brake pedal is depressed with a large clearance between the brake pa
Left Rear Wheel Speed Sensor Circuit Short to Ground or Open (C050C14)
DESCRIPTION Refer to DTC C050C12 Click here DTC No. Detection Item DTC Detection Condition Trouble Area C050C14 Left Rear Wheel Speed Sensor Circuit Short to Ground or Open A short or open circuit is detected in the speed sensor signal circuit for 0.12 seconds or more.
Rear s
© 2016-2026 Copyright www.lexguide.net
