Lexus ES: Installation
INSTALLATION
CAUTION / NOTICE / HINT
NOTICE:
This procedure includes the installation of small-head bolts. Refer to Small-Head Bolts of Basic Repair Hint to identify the small-head bolts.
Click here .gif)
PROCEDURE
1. INSTALL OIL PRESSURE CONTROL VALVE ASSEMBLY
| (a) Apply a small amount of engine oil to the O-ring of the oil pressure control valve assembly. |
|
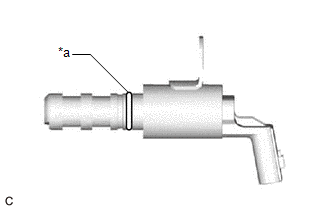
(b) Using an 8 mm socket wrench, install the oil pressure control valve assembly to the timing chain cover assembly with the bolt.
Torque:
10 N·m {102 kgf·cm, 7 ft·lbf}
NOTICE:
- When reusing the oil pressure control valve assembly, inspect the O-ring.
- Make sure that the O-ring is not cracked or does not move out of place during installation.
(c) Connect the oil pressure control valve assembly connector.
2. INSPECT FOR ENGINE OIL LEAK
Click here
3. INSTALL FRONT FENDER APRON SEAL RH
Click here
READ NEXT:
 Components
COMPONENTS ILLUSTRATION *1 ENGINE BALANCER ASSEMBLY *2 ENGINE OIL LEVEL SENSOR *3 NO. 2 OIL PAN SUB-ASSEMBLY *4 OIL PUMP ASSEMBLY *5 OIL PUMP BRACKET *6 OIL STRAINER SUB-
Disassembly
DISASSEMBLY PROCEDURE 1. REMOVE OIL PUMP RELIEF VALVE (a) Using a 27 mm socket wrench, remove the oil pump relief valve plug from the oil pump cover sub-assembly. *1 Oil Pump Relief
SEE MORE:
Freeze Frame Data
FREEZE FRAME DATA FREEZE FRAME DATA HINT: The hybrid vehicle control ECU records vehicle and driving condition information as freeze frame data the moment a DTC is stored. It can be used for estimating or duplicating the vehicle conditions that were present when the malfunction occurred. (a) Connect
All Power Windows do not Operate with Driver Side Door Key Cylinder or Wireless Transmitter
DESCRIPTION Wireless Transmitter-linked Function
When a key switch is pushed: 1) the door control receiver receives the wireless door lock signal; 2) the door control receiver sends a signal to the main body ECU (multiplex network body ECU) through the certification ECU (smart key ECU assembly);
© 2016-2026 Copyright www.lexguide.net
