Lexus ES: Inspection
INSPECTION
PROCEDURE
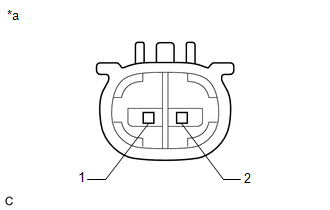
1. INSPECT OIL PRESSURE CONTROL VALVE ASSEMBLY
| (a) Measure the resistance according to the value(s) in the table below. Standard Resistance:
If the result is not as specified, replace the oil pressure control valve assembly. |
|
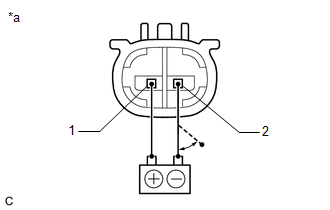
| (b) Connect a battery positive (+) lead to terminal 1 and a negative (-) lead to terminal 2. Check that a clicking sound is heard from the oil pressure control valve assembly. NOTICE:
If the result is not as specified, replace the oil pressure control valve assembly. |
|
READ NEXT:
 Installation
INSTALLATION CAUTION / NOTICE / HINT NOTICE: This procedure includes the installation of small-head bolts. Refer to Small-Head Bolts of Basic Repair Hint to identify the small-head bolts. Click here
Components
COMPONENTS ILLUSTRATION *1 ENGINE BALANCER ASSEMBLY *2 ENGINE OIL LEVEL SENSOR *3 NO. 2 OIL PAN SUB-ASSEMBLY *4 OIL PUMP ASSEMBLY *5 OIL PUMP BRACKET *6 OIL STRAINER SUB-
SEE MORE:
High Voltage Power Resource Circuit Short during Pre-Charge (P300449)
DTC SUMMARY MALFUNCTION DESCRIPTION The hybrid vehicle control ECU monitors the high-voltage wiring between the HV battery and inverter with converter assembly and detects an open circuit malfunction. The cause of this malfunction may be one of the following: Inverter voltage sensor (VH) internal c
Reassembly
REASSEMBLY PROCEDURE 1. INSTALL SPARK PLUG TUBE HINT: When using a new cylinder head sub-assembly, the spark plug tubes must be replaced. (a) Apply adhesive to a new spark plug tube as shown in the illustration. Adhesive: Toyota Genuine Adhesive 1324, Three Bond 1324 or equivalent Standard Appli
© 2016-2026 Copyright www.lexguide.net
