Lexus ES: Removal
REMOVAL
CAUTION / NOTICE / HINT
HINT:
- Use the same procedure for the RH side and LH side.
- The following procedure is for the LH side.
PROCEDURE
1. REMOVE NO. 2 DOOR TRIM PAD
Click here .gif)
2. REMOVE MULTIPLEX NETWORK MASTER SWITCH ASSEMBLY WITH FRONT DOOR UPPER ARMREST BASE PANEL (for Driver Side)
Click here
3. REMOVE POWER WINDOW REGULATOR SWITCH ASSEMBLY WITH FRONT DOOR UPPER ARMREST BASE PANEL (for Front Passenger Side)
Click here
4. REMOVE COURTESY LIGHT ASSEMBLY
Click here
5. REMOVE FRONT DOOR TRIM BOARD SUB-ASSEMBLY
Click here
6. REMOVE FRONT DOOR LOWER FRAME BRACKET GARNISH
Click here
7. REMOVE FRONT DOOR TRIM BRACKET
Click here
8. REMOVE FRONT DOOR FRONT LOWER FRAME UPPER COVER
| (a) Remove the nut. |
|
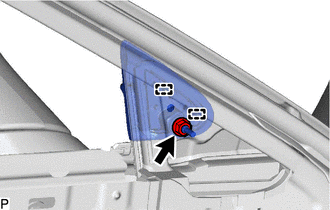
(b) Disengage the 2 guides to remove the front door front lower frame upper cover.
READ NEXT:
 Installation
INSTALLATION CAUTION / NOTICE / HINT HINT:
Use the same procedure for the RH side and LH side.
The following procedure is for the LH side.
PROCEDURE 1. INSTALL FRONT DOOR FRONT LOWER FRAME UPP
Components
COMPONENTS ILLUSTRATION *1 FRONT RADIATOR SIDE AIR GUIDE PLATE LH *2 FRONT RADIATOR SIDE AIR GUIDE PLATE RH *3 RADIATOR SHUTTER SUB-ASSEMBLY *4 THERMISTOR ASSEMBLY N*m (kgf*
SEE MORE:
Components
COMPONENTS ILLUSTRATION *1 FRONT CENTER UPPER SUSPENSION BRACE SUB-ASSEMBLY - - Tightening torque for "Major areas involving basic vehicle performance such as moving/turning/stopping" : N*m (kgf*cm, ft.*lbf) N*m (kgf*cm, ft.*lbf): Specified torque ILLUSTRATION *1 FRONT
Sound Quality is Bad Only when Disc is Played (Volume is Too Low)
CAUTION / NOTICE / HINT NOTICE:
Depending on the parts that are replaced during vehicle inspection or maintenance, performing initialization, registration or calibration may be needed. Refer to Precaution for Navigation System.
Click here
When replacing the radio receiver assembly, always re
© 2016-2026 Copyright www.lexguide.net
