Lexus ES: Removal
REMOVAL
PROCEDURE
1. REMOVE REAR NO. 1 FLOOR BOARD (for 2GR-FKS)
| (a) Remove the 4 clips (A). |
|
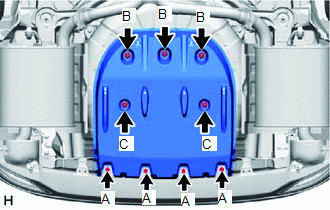
(b) Disengage the 3 grommets (B) and 2 clips (C) to remove the rear No. 1 floor board.
2. REMOVE REAR FLOOR SIDE MEMBER COVER (for A25A-FXS)
| (a) Remove the bolt and 8 clips (A). |
|
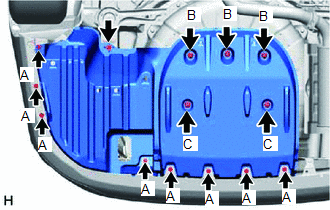
(b) Disengage the 3 grommets (B) and 2 clips (C) to remove the rear floor side member cover.
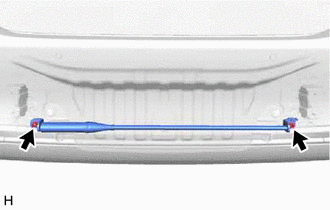
3. REMOVE SUSPENSION TOWER DAMPER
| (a) Remove the 2 nuts and the suspension tower damper from the vehicle. NOTICE: Do not extend or compress the damper. |
|
READ NEXT:
 Removal
REMOVAL PROCEDURE 1. REMOVE REAR NO. 1 FLOOR BOARD (for 2GR-FKS) (a) Remove the 4 clips (A). (b) Disengage the 3 grommets (B) and 2 clips (C) to remove the rear No. 1 floor board. 2. RE
Inspection
INSPECTION PROCEDURE 1. INSPECT SUSPENSION TOWER DAMPER (a) Visually check the suspension tower damper and, if the rod is bent, a leak is found or the damper cannot be installed without extending or c
Installation
INSTALLATION PROCEDURE 1. INSTALL SUSPENSION TOWER DAMPER (a) Using a union nut wrench, install the suspension tower damper to the vehicle with the 2 nuts. Torque: Specified tightening torque : 3
SEE MORE:
Open or Short Circuit in Motor (C13A6)
DESCRIPTION DTC No. Detection Item DTC Detection Condition Trouble Area Memory Note C13A6 Open or Short Circuit in Motor Detection conditions (1)
Diagnosis Condition:
Power switch on (IG) or electric parking brake switch assembly pushed to lock side with power switch off
Ma
Installation
INSTALLATION CAUTION / NOTICE / HINT HINT:
Use the same procedure for the RH side and LH side.
The following procedure is for the LH side.
PROCEDURE 1. INSTALL HOOD SUPPORT BRACKET (a) Engage the guide. (b) Install the hood support bracket with the bolt. Torque: 17.5 N·m {178 kgf·cm, 13 f
© 2016-2026 Copyright www.lexguide.net
