Lexus ES: Removal
REMOVAL
PROCEDURE
1. REMOVE REAR SEAT CUSHION ASSEMBLY
Click here .gif)
2. REMOVE REAR SEAT CUSHION LOCK HOOK
Click here
3. REMOVE REAR DOOR SCUFF PLATE LH
Click here
4. REMOVE REAR UNDER SIDE COVER LH
| (a) Remove the 2 clips (A). |
|

(b) Disengage the claw, 3 clips (B), 2 clips (C) and guide to remove the rear under side cover LH.
5. REMOVE REAR DOOR SCUFF PLATE RH
HINT:
Use the same procedure as for the LH side.
6. REMOVE REAR UNDER SIDE COVER RH
| (a) Remove the 2 clips (A). |
|

(b) Disengage the claw, 3 clips (B), 2 clips (C) and guide to remove the rear under side cover RH.
7. REMOVE REAR UNDER COVER
(a) Pull the rear under cover in the direction indicated by the arrow (1) shown in the illustration to disengage the 2 clips.
.png) | Remove in this Direction (1) |
.png) | Remove in this Direction (2) |
(b) Pull the rear under cover in the direction indicated by the arrow (2) shown in the illustration to disengage the 2 guides to remove it from the rear seat cushion leg sub-assembly.
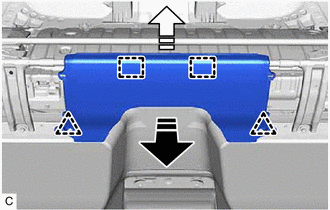
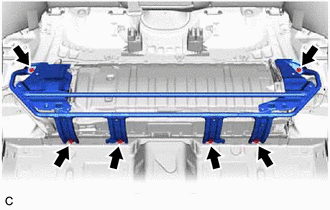
8. REMOVE REAR SEAT CUSHION LEG SUB-ASSEMBLY
| (a) Remove the 6 bolts and rear seat cushion leg sub-assembly. |
|
9. REMOVE NO. 1 HYBRID BATTERY INTAKE DUCT
| (a) Disengage the 2 clamps. |
|
| (b) Remove the 2 clips and No. 1 hybrid battery intake duct from the battery cooling blower assembly. |
|
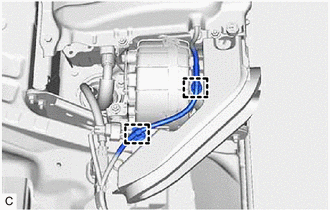
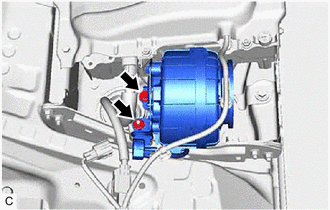
10. REMOVE BATTERY COOLING BLOWER ASSEMBLY
| (a) Disconnect the battery cooling blower assembly connector. |
|
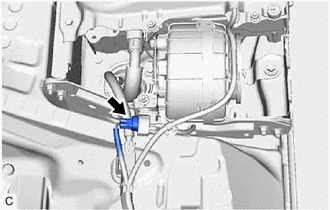
| (b) Remove the bolt, nut and battery cooling blower assembly from the HV battery. NOTICE:
|
|
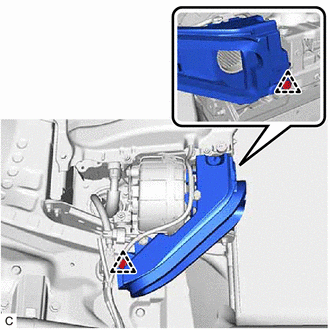
11. REMOVE BATTERY COOLING BLOWER BRACKET
| (a) Disengage the clamp. |
|
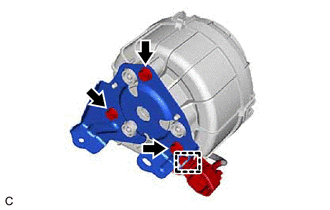
(b) Remove the 3 bolts and battery cooling blower bracket from the battery cooling blower assembly.
READ NEXT:
 Installation
INSTALLATION PROCEDURE 1. INSTALL BATTERY COOLING BLOWER BRACKET (a) Install the battery cooling blower bracket to the battery cooling blower assembly with the 3 bolts. Torque: 7.5 N·m {76 kgf·cm,
Battery Cooling Filter
ComponentsCOMPONENTS ILLUSTRATION *1 NO. 1 HV BATTERY INTAKE FILTER *2 BATTERY SERVICE HOLE COVER
SEE MORE:
On-vehicle Inspection
ON-VEHICLE INSPECTION CAUTION / NOTICE / HINT HINT:
Water Pump Construction Evaporation Port and Drain Plug: *1 Evaporation Port *2 Mechanical Seal *3 Fluid Catch Pocket *4 Drain Plug *a Typical Water Pump Assembly - -
Water Pump Mechanical Seal
The water pum
Fail-safe Chart
FAIL-SAFE CHART If a problem occurs in the power steering system, the power steering assist will be stopped or the amount of power assist will be decreased to protect the system. Power Steering System Malfunction Fail-safe Operation EPS warning light Buzzer
Torque sensor (rack and pi
