Lexus ES: Removal
REMOVAL
PROCEDURE
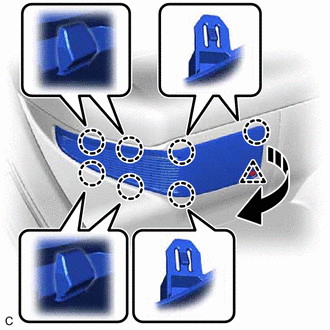
1. REMOVE BATTERY SERVICE HOLE COVER
(a) Remove the clip.
.png) |
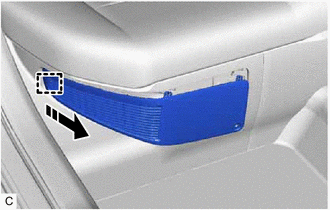
Remove in this Direction |
(b) Disengage the 7 claws as shown in the illustration.
(c) Disengage the guide to remove the battery service hole cover as shown in the illustration.
|
|
Remove in this Direction |
2. REMOVE NO. 1 HV BATTERY INTAKE FILTER
HINT:
If the message "Maintenance Required for Traction Battery Cooling Parts See Owner's Manual" is displayed on the multi-information display, inspect the No. 1 HV battery intake filter.
Click here .gif)
|
(a) Disengage the 3 claws. |
|
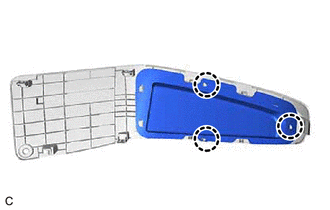
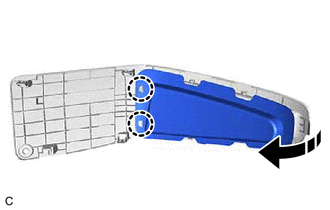
(b) Disengage the 2 claws to remove the No. 1 HV battery intake filter from the battery service hole cover as shown in the illustration.
|
|
Remove in this Direction |
READ NEXT:
 Inspection
INSPECTION
PROCEDURE
1. INSPECT NO. 1 HV BATTERY INTAKE FILTER
HINT:
If the vehicle is used in an area with heavy traffic or excessive dust,
or if the rear seat is used frequently, the
Installation
INSTALLATION
PROCEDURE
1. INSTALL NO. 1 HV BATTERY INTAKE FILTER
(a) Engage the 2 claws to temporarily install the No. 1 HV battery intake filter
to the battery service hole cover.
(b) Engage th
Installation
INSTALLATION
PROCEDURE
1. INSTALL NO. 1 HV BATTERY INTAKE FILTER
(a) Engage the 2 claws to temporarily install the No. 1 HV battery intake filter
to the battery service hole cover.
(b) Engage th
SEE MORE:
Engine Coolant Temperature Sensor 1 Signal Stuck in Range (P01152A)
DESCRIPTION Refer to DTC P011511. Click here DTC No. Detection Item DTC Detection Condition Trouble Area MIL Memory Note P01152A Engine Coolant Temperature Sensor 1 Signal Stuck in Range Either of the following conditions is met (2 trip detection logic):
When engine is st
Parts Location
PARTS LOCATION ILLUSTRATION *1 FORWARD RECOGNITION CAMERA *2 FORWARD RECOGNITION WITH HEATER HOOD SUB-ASSEMBLY *3 BRAKE BOOSTER WITH MASTER CYLINDER ASSEMBLY - SKID CONTROL ECU - - ILLUSTRATION *1 STEERING SENSOR *2 AIRBAG ECU ASSEMBLY - YAW RATE SENSOR *3 MAIN
© 2016-2026 Copyright www.lexguide.net
