
Lexus ES: Removal
REMOVAL
PROCEDURE
1. REMOVE FRONT WHEEL OPENING EXTENSION PAD LH
Click here .gif)
2. REMOVE FRONT WHEEL OPENING EXTENSION PAD RH
Click here
3. REMOVE NO. 1 ENGINE UNDER COVER
Click here
4. REMOVE NO. 2 ENGINE UNDER COVER ASSEMBLY
Click here
5. REMOVE V-RIBBED BELT
|
(a) Release the V-ribbed belt tension by turning the V-ribbed belt tensioner assembly counterclockwise. |
|
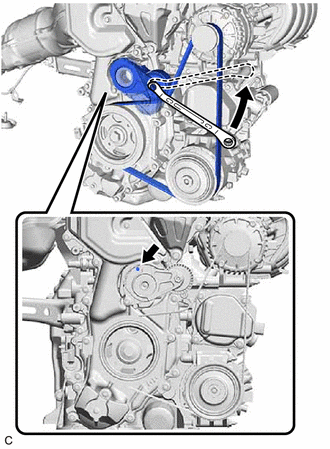
(b) Turn the V-ribbed belt tensioner assembly counterclockwise to align its holes, and then insert a 5 mm hexagon wrench to secure the V-ribbed belt tensioner assembly.
(c) Remove the V-ribbed belt from the V-ribbed belt tensioner assembly.
READ NEXT:
 Installation
INSTALLATION
PROCEDURE
1. INSTALL V-RIBBED BELT
HINT:
When reusing the V-ribbed belt, check the ribs and back of the V-ribbed belt
for wear and cracks. If wear or a crack that reaches the core (
A25a-fks Oil And Oil Filter
Components
COMPONENTS
ILLUSTRATION
*1
CENTER NO. 4 ENGINE UNDER COVER
-
-
ILLUSTRATION
*1
OIL FILTER SUB-ASSEMBLY
A25a-fks Spark Plug
Removal
REMOVAL
CAUTION / NOTICE / HINT
The necessary procedures (adjustment, calibration, initialization or registration)
that must be performed after parts are removed and installed, or repla
SEE MORE:
Reassembly
REASSEMBLY CAUTION / NOTICE / HINT NOTICE: Steps 10 to 17 are temporary reassembly procedures for adjustment purposes. PROCEDURE 1. INSTALL STRAIGHT PIN (a) Using a plastic-faced hammer, install the 4 straight pins to the rear differential carrier sub-assembly. *a 8.0 to 9.0 mm (0.315 to 0.354
Components
COMPONENTS ILLUSTRATION *1 COURTESY LIGHT ASSEMBLY *2 REAR DOOR TRIM BOARD SUB-ASSEMBLY *3 REAR DOOR TRIM UPPER PAD *4 REAR POWER WINDOW REGULATOR SWITCH ASSEMBLY WITH REAR DOOR UPPER ARMREST BASE PANEL ILLUSTRATION *A w/ Rear Door Sunshade - - *1 POWER WINDOW
© 2016-2026 Copyright www.lexguide.net
