Lexus ES: Installation
INSTALLATION
PROCEDURE
1. INSTALL V-RIBBED BELT
HINT:
When reusing the V-ribbed belt, check the ribs and back of the V-ribbed belt for wear and cracks. If wear or a crack that reaches the core (at more than 1 point) is found, replace the V-ribbed belt.
|
(a) Set the V-ribbed belt onto each pulley as shown in the illustration. |
|
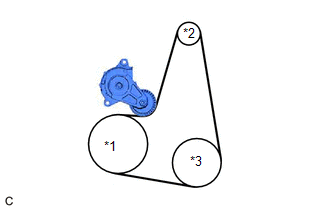
(b) Turn the V-ribbed belt tensioner assembly clockwise and remove the 5 mm hexagon wrench.
|
(c) After installing the V-ribbed belt, check that it fits properly in the ribbed grooves. Confirm that the V-ribbed belt has not slipped out of the grooves on the bottom of the pulley by hand. |
|
.png)
2. INSTALL NO. 2 ENGINE UNDER COVER ASSEMBLY
Click here .gif)
3. INSTALL NO. 1 ENGINE UNDER COVER
Click here
4. INSTALL FRONT WHEEL OPENING EXTENSION PAD LH
Click here
5. INSTALL FRONT WHEEL OPENING EXTENSION PAD RH
Click here
READ NEXT:
 A25a-fks Oil And Oil Filter
Components
COMPONENTS
ILLUSTRATION
*1
CENTER NO. 4 ENGINE UNDER COVER
-
-
ILLUSTRATION
*1
OIL FILTER SUB-ASSEMBLY
A25a-fks Spark Plug
Removal
REMOVAL
CAUTION / NOTICE / HINT
The necessary procedures (adjustment, calibration, initialization or registration)
that must be performed after parts are removed and installed, or repla
A25a-fxs Air Cleaner Filter Element
Components
COMPONENTS
ILLUSTRATION
*1
AIR CLEANER CAP SUB-ASSEMBLY
*2
AIR CLEANER FILTER ELEMENT SUB-ASSEMBLY
Removal
REMOVAL
PROCEDURE
SEE MORE:
Precaution
PRECAUTION PRECAUTION FOR DISCONNECTING CABLE FROM NEGATIVE AUXILIARY BATTERY TERMINAL NOTICE: When disconnecting the cable from the negative (-) auxiliary battery terminal, initialize the following systems after the cable is reconnected. System Name See Procedure Lane Control System (for H
Utility
UTILITY OPERATION HISTORY HINT: History of Reason for Operation: The windshield wiper motor assembly stores Operation History which can be read using the Techstream, when a malfunction of the wiper and washer system occurs. Click here (a) Connect the Techstream to the DLC3. (b) Turn the power swit
