Lexus ES: Installation
Lexus ES (XZ10) Service Manual / Vehicle Exterior / Lighting (ext) / Rear Light Assembly / Installation
INSTALLATION
CAUTION / NOTICE / HINT
HINT:
- Use the same procedure for the RH side and LH side.
- The following procedure is for the LH side.
PROCEDURE
1. INSTALL REAR LIGHT ASSEMBLY
| (a) Engage the clip. |
|
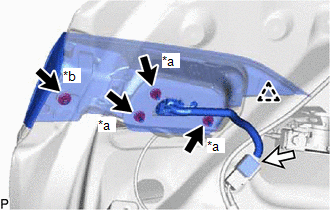
(b) Install the rear light assembly with the 3 nuts and cap nut.
Torque:
4.5 N·m {46 kgf·cm, 40 in·lbf}
(c) Connect the connector.
2. INSTALL LUGGAGE COMPARTMENT DOOR COVER
Click here .gif)
3. INSTALL SWITCH BEZEL (w/ Power Trunk Lid System)
Click here
4. INSTALL LUGGAGE LOCK CONTROL CABLE PLATE
Click here
READ NEXT:
 Relay
Relay
On-vehicle InspectionON-VEHICLE INSPECTION PROCEDURE 1. INSPECT H-LP LH RELAY (a) Measure the resistance according to the value(s) in the table below. Standard Resistance: Tester Connection Co
Components
COMPONENTS ILLUSTRATION *A w/o Panoramic View Monitor System *B w/ Panoramic View Monitor System *1 OUTER MIRROR *2 OUTER MIRROR COVER ASSEMBLY *3 OUTER MIRROR LOWER COVER
SEE MORE:
Transmitter ID 1 not Received (Main) (C2121-C2124,C2181-C2184)
DESCRIPTION The tire pressure warning valve and transmitters that are installed in the tire and wheel assemblies measure the tire pressure of each wheel. The measured values are transmitted to the tire pressure warning ECU and receiver in the vehicle as radio waves. The ECU compares the measured tir
Components
COMPONENTS ILLUSTRATION *1 ENGINE ASSEMBLY WITH TRANSAXLE *2 FRONT BUMPER EXTENSION SUB-ASSEMBLY RH *3 FRONT BUMPER EXTENSION SUB-ASSEMBLY LH *4 FRONT SUSPENSION MEMBER BRACKET SUB-ASSEMBLY RH *5 FRONT SUSPENSION MEMBER BRACKET SUB-ASSEMBLY LH *6 NO. 2 ENGINE MOUNTING S
© 2016-2026 Copyright www.lexguide.net
