Lexus ES: Disassembly
DISASSEMBLY
PROCEDURE
1. REMOVE CLUTCH DRUM OIL SEAL RING
| (a) Remove the 4 clutch drum oil seal rings from the stator shaft assembly. NOTICE: Do not expand the gap of the clutch drum oil seal rings excessively. |
|
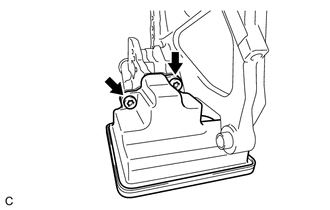
2. REMOVE OIL STRAINER ASSEMBLY
| (a) Using a T30 "TORX" socket wrench, remove the 2 "TORX" bolts and oil strainer assembly from the front oil pump cover sub-assembly. |
|
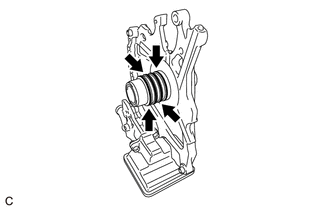
3. REMOVE STATOR SHAFT ASSEMBLY
| (a) Remove the 5 bolts and stator shaft assembly from the front oil pump body. |
|
.png)
4. REMOVE FRONT OIL PUMP DRIVE GEAR
| (a) Remove the front oil pump drive gear from the front oil pump body. |
|
.png)
5. REMOVE FRONT OIL PUMP DRIVEN GEAR
| (a) Remove the front oil pump driven gear from the front oil pump body. |
|
.png)
6. REMOVE FRONT OIL PUMP BODY
| (a) Remove the front oil pump body from the front oil pump cover sub-assembly. |
|
.png)
7. REMOVE RING PIN
| (a) Remove the 2 ring pins from the front oil pump cover sub-assembly. |
|
.png)
READ NEXT:
 Inspection
INSPECTION PROCEDURE 1. INSPECT FRONT OIL PUMP ASSEMBLY (a) Install the oil pump drive shaft sub-assembly to the front oil pump assembly. NOTICE:
To avoid damaging the bush of the front oil pump as
Reassembly
REASSEMBLY PROCEDURE 1. INSTALL RING PIN (a) Install the 2 ring pins to the front oil pump cover sub-assembly. 2. INSTALL FRONT OIL PUMP BODY (a) Install the front oil pump body to t
SEE MORE:
Terminals Of Ecu
TERMINALS OF ECU CHECK PARKING BRAKE ECU (BRAKE ACTUATOR ASSEMBLY) *a Front view of wire harness connector (to Parking Brake ECU (Brake Actuator Assembly)) - - (a) Disconnect the A54 parking brake ECU (brake actuator assembly) connector. (b) Measure the voltage and resistance according
Left Rear Wheel ABS Hold Solenoid Control Circuit Short to Battery (C12D112,...,C12DC49)
DESCRIPTION The ABS solenoid relay and solenoid valves are built into the brake actuator assembly. The rear solenoid valve LH controls the brake fluid pressure of the rear wheel cylinder LH of the vehicle. When this DTC is stored, the fail-safe function operates and the ABS solenoid relay is turned
