
Lexus ES: Components
COMPONENTS
ILLUSTRATION
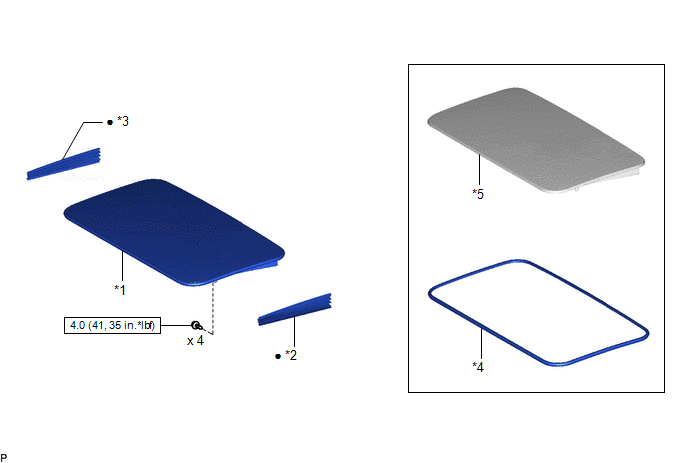
| *1 | SLIDING ROOF OR REMOVABLE ROOF PANEL SUB-ASSEMBLY | *2 | SLIDING ROOF SIDE GARNISH LH |
| *3 | SLIDING ROOF SIDE GARNISH RH | *4 | SLIDING ROOF WEATHERSTRIP |
| *5 | SLIDING ROOF PANEL SUB-ASSEMBLY | - | - |
.png) | N*m (kgf*cm, ft.*lbf): Specified torque | ● | Non-reusable part |
ILLUSTRATION
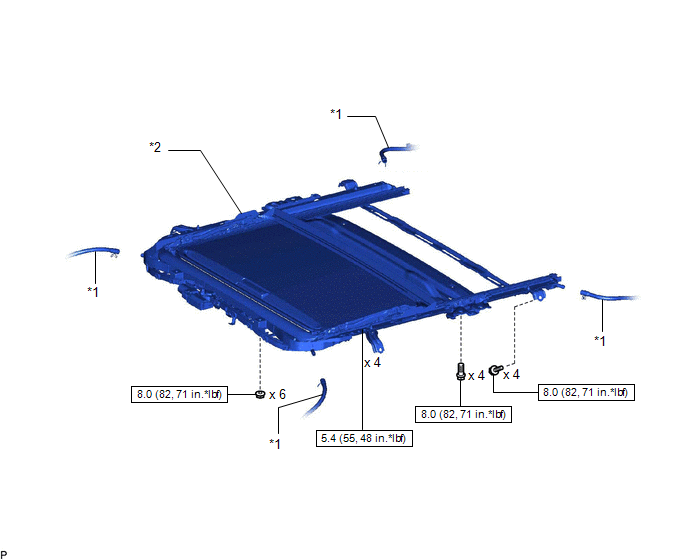
| *1 | SLIDING ROOF DRAIN HOSE | *2 | SLIDING ROOF OR REMOVABLE ROOF HOUSING SUB-ASSEMBLY |
| | N*m (kgf*cm, ft.*lbf): Specified torque | - | - |
ILLUSTRATION
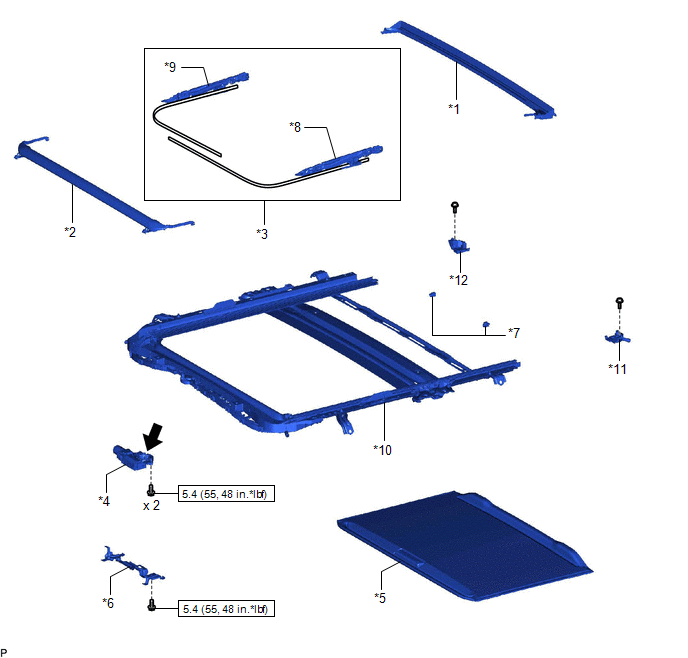
| *1 | REAR ROOF DRIP CHANNEL | *2 | ROOF WIND DEFLECTOR PANEL SUB-ASSEMBLY |
| *3 | SLIDING ROOF DRIVE CABLE SUB-ASSEMBLY | *4 | SLIDING ROOF DRIVE GEAR SUB-ASSEMBLY |
| *5 | SUNSHADE TRIM SUB-ASSEMBLY | *6 | MAP LIGHT BRACKET |
| *7 | REAR SLIDING ROOF SUNSHADE STOPPER | *8 | SLIDING ROOF DRIVE CABLE LH |
| *9 | SLIDING ROOF DRIVE CABLE RH | *10 | SLIDING ROOF HOUSING SUB-ASSEMBLY |
| *11 | SLIDING ROOF PIECE SUB-ASSEMBLY LH | *12 | SLIDING ROOF PIECE SUB-ASSEMBLY RH |
| | N*m (kgf*cm, ft.*lbf): Specified torque | .png) | MP grease |
READ NEXT:
 Removal
REMOVAL CAUTION / NOTICE / HINT The necessary procedures (adjustment, calibration, initialization or registration) that must be performed after parts are removed and installed, or replaced during slid
Disassembly
DISASSEMBLY PROCEDURE 1. REMOVE SLIDING ROOF DRIVE GEAR SUB-ASSEMBLY (a) Remove the bolt. Remove in this Direction (b) Disengage the claw and guide as shown in the illustration to remove the
Reassembly
REASSEMBLY PROCEDURE 1. INSTALL ROOF WIND DEFLECTOR PANEL SUB-ASSEMBLY (a) Move the roof wind deflector panel sub-assembly in the direction indicated by the arrow (1) shown in the illustration to enga
SEE MORE:
Lost Communication with Battery Monitor Module Missing Message (P162B87)
DESCRIPTION The hybrid vehicle control ECU communicates with the battery state sensor assembly via LIN communication. If a LIN communication error is detected, the hybrid vehicle control ECU stores this DTC. DTC No. Detection Item DTC Detection Condition Trouble Area Warning Indicate Me
Diagnosis System
DIAGNOSIS SYSTEM DIAGNOSIS FUNCTION (a) The diagnosis function turns off the cruise control indicator, illuminates the master warning light and displays a warning message when a malfunction is detected. When a malfunction is detected in the dynamic radar cruise control system, DTCs are stored in the
