Lexus ES: Components
COMPONENTS
ILLUSTRATION
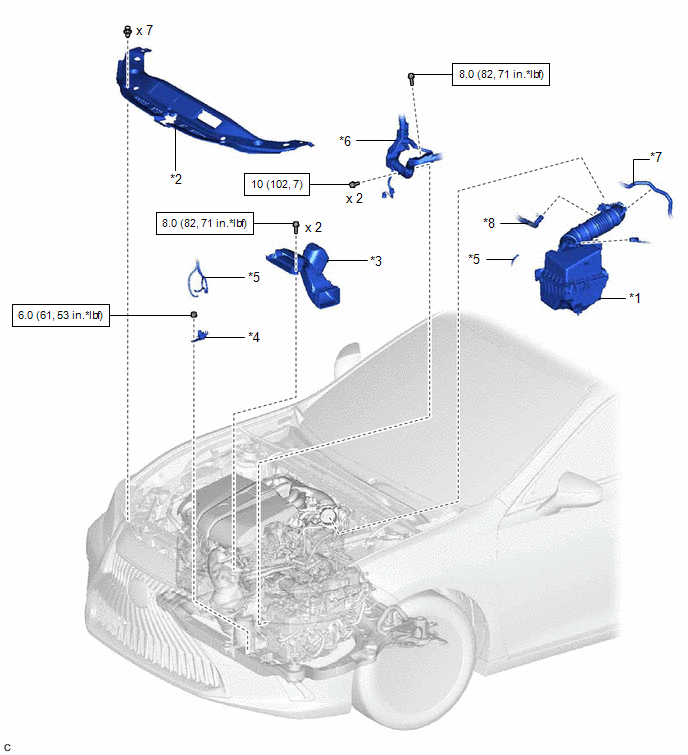
| *1 | AIR CLEANER ASSEMBLY WITH AIR CLEANER HOSE | *2 | COOL AIR INTAKE DUCT SEAL |
| *3 | INLET AIR CLEANER ASSEMBLY | *4 | VACUUM SWITCHING VALVE (for Active Control Engine Mount System) |
| *5 | VACUUM HOSE | *6 | ENGINE WIRE |
| *7 | NO. 1 FUEL VAPOR FEED HOSE | *8 | NO. 2 VENTILATION HOSE |
.png) | N*m (kgf*cm, ft.*lbf): Specified torque | - | - |
READ NEXT:
 Removal
REMOVAL PROCEDURE 1. REMOVE COOL AIR INTAKE DUCT SEAL Click here 2. REMOVE INLET AIR CLEANER ASSEMBLY Click here 3. REMOVE AIR CLEANER ASSEMBLY WITH AIR CLEANER HOSE Click here 4. REMOVE VA
Inspection
INSPECTION PROCEDURE 1. INSPECT VACUUM SWITCHING VALVE (for Active Control Engine Mount System) (a) Measure the resistance. (1) Measure the resistance according to the value(s) in the table below.
Installation
INSTALLATION PROCEDURE 1. INSTALL VACUUM SWITCHING VALVE (for Active Control Engine Mount System) (a) Install the vacuum switching valve (for active control engine mount system) to the front engine mo
SEE MORE:
Installation
INSTALLATION PROCEDURE 1. INSTALL REAR SPOILER SUB-ASSEMBLY HINT: When installing a new rear spoiler sub-assembly, heat the luggage compartment door panel and rear spoiler sub-assembly using a heat light. Heating Temperature Item Temperature Luggage Compartment Door Panel 40 to 60°C (104
Customize Parameters
CUSTOMIZE PARAMETERS CUSTOMIZE PARKING SUPPORT ALERT SYSTEM (a) Customizing with the Techstream NOTICE:
When the customer requests a change in a function, first make sure that the function can be customized.
Be sure to make a note of the current settings before customizing.
When troubleshooti
© 2016-2026 Copyright www.lexguide.net
