Lexus ES: Removal
REMOVAL
PROCEDURE
1. REMOVE COOL AIR INTAKE DUCT SEAL
Click here .gif)
2. REMOVE INLET AIR CLEANER ASSEMBLY
Click here
3. REMOVE AIR CLEANER ASSEMBLY WITH AIR CLEANER HOSE
Click here
4. REMOVE VACUUM SWITCHING VALVE (for Active Control Engine Mount System)
| (a) Remove the bolt and disengage the wire harness clamp to separate the engine wire. |
|
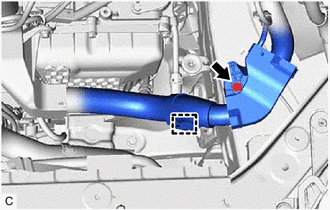
| (b) Remove the 2 bolts. |
|

(c) Disengage the wire harness clamp and disconnect the vacuum switching valve (for active control engine mount system) connector.
| (d) Disconnect the 3 vacuum hoses from the vacuum switching valve (for active control engine mount system). |
|
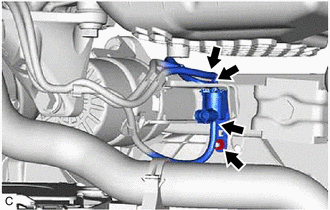
(e) Remove the nut and vacuum switching valve (for active control engine mount system) from the front engine mounting insulator.
READ NEXT:
 Inspection
INSPECTION PROCEDURE 1. INSPECT VACUUM SWITCHING VALVE (for Active Control Engine Mount System) (a) Measure the resistance. (1) Measure the resistance according to the value(s) in the table below.
Installation
INSTALLATION PROCEDURE 1. INSTALL VACUUM SWITCHING VALVE (for Active Control Engine Mount System) (a) Install the vacuum switching valve (for active control engine mount system) to the front engine mo
SEE MORE:
Receiver Error (C2176)
DESCRIPTION Tire pressure warning valve and transmitter signals are transmitted to the tire pressure warning ECU and receiver in the vehicle as radio waves. DTC No. Detection Item DTC Detection Condition Trouble Area Note C2176 Receiver Error Malfunction in the tire pressure warni
Check Bus 1 Lines for Short Circuit
DESCRIPTION There may be a short circuit between the CAN main bus lines and/or CAN branch lines when the resistance between terminals 23 (CA1H) and 8 (CA1L) of the central gateway ECU (network gateway ECU) is below 54 Ω. Symptom Trouble Area Resistance between terminals 23 (CA1H) and 8 (CA
© 2016-2026 Copyright www.lexguide.net
