Lexus ES: Components
COMPONENTS
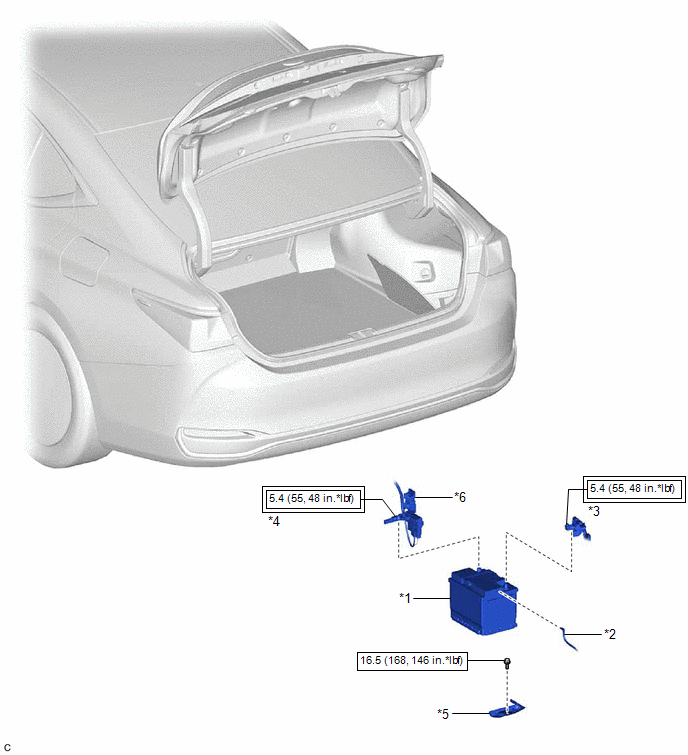
ILLUSTRATION
|
*1 |
AUXILIARY BATTERY |
*2 |
BATTERY HOSE |
|
*3 |
NEGATIVE AUXILIARY BATTERY TERMINAL |
*4 |
POSITIVE AUXILIARY BATTERY TERMINAL |
|
*5 |
NO. 3 BATTERY CLAMP |
*6 |
TERMINAL CONNECTOR COVER |
.png) |
Tightening torque for "Major areas involving basic vehicle performance such as moving/turning/stopping": N*m (kgf*cm, ft.*lbf) |
.png) |
N*m (kgf*cm, ft.*lbf): Specified torque |
READ NEXT:
 Removal
REMOVAL
CAUTION / NOTICE / HINT
The necessary procedures (adjustment, calibration, initialization or registration)
that must be performed after parts are removed and installed, or replaced during
Installation
INSTALLATION
PROCEDURE
1. INSTALL AUXILIARY BATTERY
(a) Install the auxiliary battery.
(b) Install the No. 3 battery clamp with the bolt.
Install in this Direction
SEE MORE:
Back-up Light Circuit
DESCRIPTION The hybrid vehicle control ECU controls the back-up lights via the BKUP LP relay. WIRING DIAGRAM CAUTION / NOTICE / HINT NOTICE:
Inspect the fuses for circuits related to this system before performing the following procedure.
Before replacing the hybrid vehicle control ECU, refer t
Freeze Frame Data
FREEZE FRAME DATA DESCRIPTION The ECM records vehicle and driving condition information as freeze frame data the moment a DTC is stored. When troubleshooting, freeze frame data can be helpful in determining whether the vehicle was moving or stationary, whether the engine was warmed up or not, whethe
© 2016-2026 Copyright www.lexguide.net
