Lexus ES: Installation
INSTALLATION
PROCEDURE
1. INSTALL LUGGAGE COMPARTMENT DOOR WEATHERSTRIP
| (a) Make sure to remove any non-drying sealant from the installation surfaces on the vehicle body. NOTICE: If there is any non-drying sealant remaining on the vehicle body, the luggage compartment door weatherstrip may not be able to be securely installed and may fall off. Make sure to completely remove the non-drying sealant from both the interior side and exterior side installation surfaces on the vehicle body. |
|
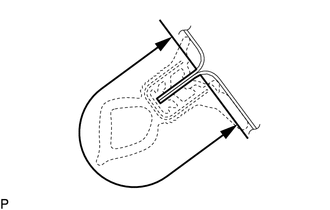
(b) Align the joint of a new luggage compartment door weatherstrip with the luggage compartment door lock striker and temporarily install the luggage compartment door weatherstrip.
| *a | Alignment Mark (Yellow) | *b | Alignment Mark (Pink) |
| *c | Joint | - | - |
.png) | Flange Position | - | - |
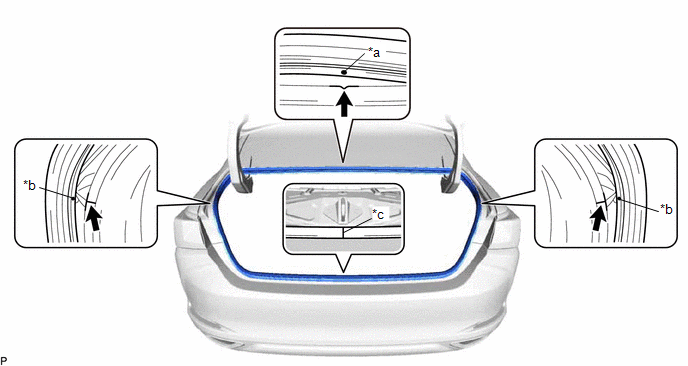
(c) Align the alignment marks on the luggage compartment door weatherstrip with the flanges on the vehicle body indicated by the arrows, and install the luggage compartment door weatherstrip.
NOTICE:
- Make sure to position the alignment marks correctly during installation. Failure to do so may lead to water ingress.
- After installation, check that the corners fit correctly.
HINT:
Make sure to install the parts of the luggage compartment door weatherstrip near the joint and alignment marks shown in the illustration first, and then install the corners.
2. INSTALL REAR FLOOR FINISH PLATE
Click here .gif)
3. INSTALL SPARE WHEEL COVER TRAY
Click here
4. INSTALL LUGGAGE COMPARTMENT FLOOR MAT
Click here
READ NEXT:
 Components
COMPONENTS ILLUSTRATION *1 LUGGAGE COMPARTMENT FLOOR MAT *2 SPARE WHEEL COVER TRAY ILLUSTRATION *1 REAR FLOOR FINISH PLATE *2 LUGGAGE HOLD BELT STRIKER ASSEMBLY ILLUSTRATION
Removal
REMOVAL CAUTION / NOTICE / HINT The necessary procedures (adjustment, calibration, initialization, or registration) that must be performed after parts are removed and installed, or replaced during lug
SEE MORE:
Data List / Active Test
DATA LIST / ACTIVE TEST NOTICE: In the table below, the values listed under "Normal Condition" are reference values. Do not depend solely on these reference values when deciding whether a part is faulty or not. The actual values may differ from the values listed in the chart under "Reference Value"
Fail-safe Chart
FAIL-SAFE CHART DTC Trouble Area Parking Brake Indicator Light (Red) Brake System Warning Light (Yellow) Fail-safe Deactivation Condition C059704 Skid control ECU (brake actuator assembly) internal malfunction Normal Illuminates After returning to normal condition, turn engine
