Lexus ES: Installation
INSTALLATION
PROCEDURE
1. INSTALL AUXILIARY BATTERY
(a) Install the auxiliary battery.
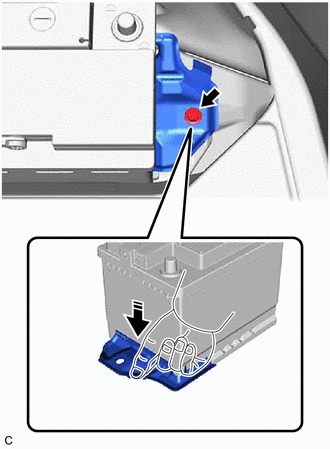
(b) Install the No. 3 battery clamp with the bolt.
.png) |
Install in this Direction |
Torque:
16.5 N·m {168 kgf·cm, 12 ft·lbf}
(c) Connect the battery hose to the auxiliary battery.
NOTICE:
- Do not twist the battery hose.
- Push the battery hose onto the auxiliary battery until a click sound is heard.
(d) Connect the cable to the positive (+) auxiliary battery terminal and tighten the nut.
Torque:
5.4 N·m {55 kgf·cm, 48 in·lbf}
(e) Engage the 2 claws to close the battery terminal connector cover.
2. CONNECT CABLE TO NEGATIVE AUXILIARY BATTERY TERMINAL
(a) Connect the cable to the negative (-) auxiliary battery terminal and tighten the nut.
Torque:
5.4 N·m {55 kgf·cm, 48 in·lbf}
NOTICE:
When disconnecting the cable, some systems need to be initialized after the cable is reconnected.
Click here .gif)
(b) Return the luggage compartment trim cover RH to its original position.
READ NEXT:
 Components
COMPONENTS
ILLUSTRATION
*1
RADIATOR CAP SUB-ASSEMBLY
*2
RADIATOR DRAIN COCK PLUG
*3
NO. 1 ENGINE UNDER COVER
-
Replacement
REPLACEMENT
CAUTION / NOTICE / HINT
CAUTION:
Do not remove the radiator cap sub-assembly or radiator drain cock plug while
the engine and radiator assembly are still hot. Pressurized, hot engine
SEE MORE:
Reassembly
REASSEMBLY CAUTION / NOTICE / HINT HINT:
Use the same procedure for the RH side and LH side.
The following procedure is for the LH side.
PROCEDURE 1. INSTALL HEADLIGHT SEAL (for TMC Made) Click here 2. INSTALL HEADLIGHT BRACKET (for TMC Made) (a) Engage the 2 guides. (b) Ins
Open in One Side of Bus 5 Branch Line
DESCRIPTION When the CAN bus main lines are normal (no open, short to ground, short to +B or short between lines) and there is an ECU or sensor on the "Communication Bus Check" screen that is indicated as not communicating or whose connection status on the "Communication Bus Check" screen changes in
