Lexus ES: Removal
REMOVAL
CAUTION / NOTICE / HINT
The necessary procedures (adjustment, calibration, initialization or registration) that must be performed after parts are removed and installed, or replaced during tire pressure warning valve and transmitter removal/installation are shown below.
Necessary Procedures After Parts Removed/Installed/Replaced (for Gasoline Model)| Replacement Part or Procedure | Necessary Procedures | Effects/Inoperative when not Performed | Link |
|---|---|---|---|
| Tire pressure warning valve and transmitter |
|
| for Registration for Initialization |
| Replacement Part or Procedure | Necessary Procedures | Effects/Inoperative when not Performed | Link |
|---|---|---|---|
| Tire pressure warning valve and transmitter |
|
| for Registration for Initialization |
PROCEDURE
1. REMOVE WHEEL ASSEMBLY
Click here .gif)
2. REMOVE TIRE PRESSURE WARNING VALVE AND TRANSMITTER
(a) Remove the tire valve cap.
NOTICE:
Keep the removed tire valve cap.
(b) Remove the valve core to release the air from the tire.
NOTICE:
Make sure that a sufficient amount of air has been released.
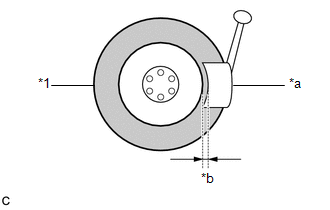
(c) Using an 11 mm deep socket wrench, remove the nut and washer.
(d) Drop the tire pressure warning valve and transmitter with grommet into the tire.
HINT:
The grommet may remain attached to the rim.
| (e) Using a tire remover, remove the tire from the disc wheel. NOTICE:
|
|
(f) Take out the tire pressure warning valve and transmitter with grommet from the tire.
(g) Remove the grommet from the tire pressure warning valve and transmitter.
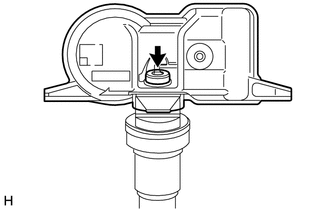
| (h) Using a T10 "TORX" socket wrench, remove the bolt and tire pressure monitor sensor from the tubeless tire valve. |
|
READ NEXT:
 Installation
INSTALLATION CAUTION / NOTICE / HINT NOTICE:
Always use a new bolt, grommet, tubeless tire valve and valve core when installing the tire pressure warning valve and transmitter.
Check that the was
Disposal
DISPOSAL CAUTION / NOTICE / HINT HINT: The tire pressure warning valve and transmitter is powered by a lithium battery. When disposing of the tire pressure warning valve and transmitter, remove the ba
Vehicle Exterior
h1 {color:red;} h2 {color:blue;} h3 {color:green;}
SEE MORE:
Voice Recognition Microphone Disconnected (B1579)
DESCRIPTION The radio receiver assembly and telephone microphone assembly are connected to each other using the microphone connection detection signal lines. This DTC is stored when a microphone connection detection signal line is disconnected. DTC No. Detection Item DTC Detection Condition
System Description
SYSTEM DESCRIPTION FRONT WIPER AND WASHER CONTROL FUNCTION Control/Function Description Wiper speed regulation Maintains the default speed of the wipers even when the supply voltage or resistance changes. Door open linked wiper suspend function*2 Stops the front wipers when the wind
