Lexus ES: Rear Wheel House Plate
Components
COMPONENTS
ILLUSTRATION
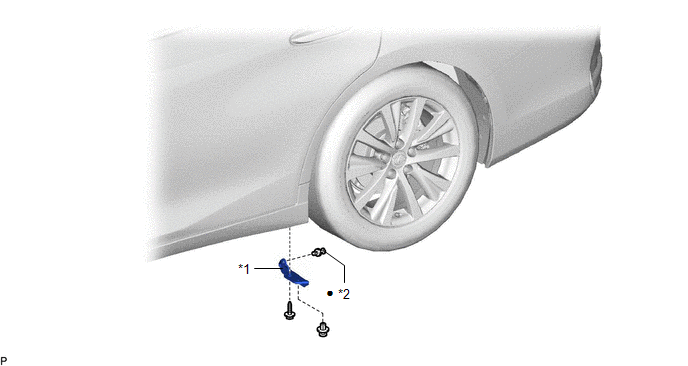
| *1 | NO. 2 ROCKER PANEL MOULDING PROTECTOR | *2 | CLIP |
| ● | Non-reusable part | - | - |
Removal
REMOVAL
CAUTION / NOTICE / HINT
HINT:
- Use the same procedure for the RH side and LH side.
- The following procedure is for the LH side.
PROCEDURE
1. REMOVE NO. 2 ROCKER PANEL MOULDING PROTECTOR
| (a) Remove the 2 clips. |
|
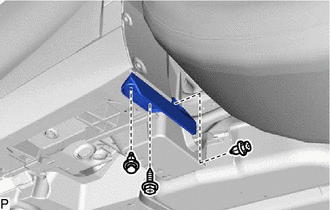
(b) Remove the screw and No. 2 rocker panel moulding protector.
Installation
INSTALLATION
CAUTION / NOTICE / HINT
HINT:
- Use the same procedure for the RH side and LH side.
- The following procedure is for the LH side.
PROCEDURE
1. INSTALL NO. 2 ROCKER PANEL MOULDING PROTECTOR
| (a) Temporarily install the No. 2 rocker panel moulding protector with the screw. |
|
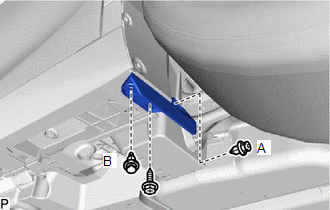
(b) Install a new clip (A).
(c) Install the No. 2 rocker panel moulding protector with the clip (B).
READ NEXT:
 Components
COMPONENTS ILLUSTRATION *1 BODY ROCKER PANEL MOULDING ASSEMBLY *2 NO. 2 ROCKER PANEL MOULDING PROTECTOR *3 ROCKER PANEL MOULDING COVER *4 CLIP ● Non-reusable part - -
Removal
REMOVAL CAUTION / NOTICE / HINT HINT:
Use the same procedure for the RH side and LH side.
The following procedure is for the LH side.
PROCEDURE 1. REMOVE NO. 2 ROCKER PANEL MOULDING PROTECTOR
SEE MORE:
On-vehicle Inspection
ON-VEHICLE INSPECTION PROCEDURE 1. INSPECT CAM TIMING CONTROL MOTOR WITH EDU ASSEMBLY (a) Check Rotation Direction Signal: (1) Connect the Techstream to the DLC3. (2) Turn the engine switch on (IG). (3) Turn the Techstream on. (4) Enter the following menus: Powertrain / Engine / Data List / VVT-iE M
Removal
REMOVAL CAUTION / NOTICE / HINT The necessary procedures (adjustment, calibration, initialization, or registration) that must be performed after parts are removed and installed, or replaced during rear suspension arm assembly removal/installation are shown below. Necessary Procedures After Parts Rem
© 2016-2026 Copyright www.lexguide.net
