Lexus ES: On-vehicle Inspection
ON-VEHICLE INSPECTION
CAUTION / NOTICE / HINT
CAUTION:
To prevent injury due to contact with an operating V-ribbed belt or cooling fan, keep your hands and clothing away from the V-ribbed belt and cooling fan when working in the engine compartment with the engine running or the engine switch on (IG).
.png)
PROCEDURE
1. PERFORM SPARK TEST
(a) Connect the Techstream to the DLC3.
(b) Turn the engine switch on (IG).
(c) Turn the Techstream on.
(d) Enter the following menus: Powertrain / Engine / Trouble Codes.
(e) Check for DTCs.
Powertrain > Engine > Trouble CodesNOTICE:
If any DTCs are output, perform troubleshooting in accordance with the procedure for each DTC.
(f) Turn the engine switch off.
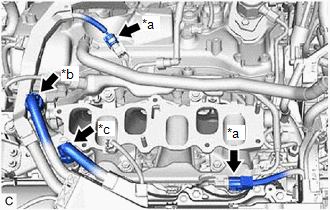
(g) Remove the intake air surge tank assembly.
Click here .gif)
(h) Remove the 6 ignition coil assemblies and 6 spark plugs.
Click here
| (i) Disconnect the 2 No. 5 engine wire connectors (for Port Injection). NOTICE: Perform this step in order to stop fuel injection to prevent damage to the catalyst due to unburned fuel. |
|
(j) Disconnect the No. 6 engine wire connector and No. 7 engine wire connector (for Direct Injection).
NOTICE:
Perform this step in order to stop fuel injection to prevent damage to the catalyst due to unburned fuel.
(k) Install the spark plug to the ignition coil assembly, and then connect the ignition coil assembly connector.
(l) Ground the spark plug.
(m) Check that spark occurs at each spark plug while the engine is being cranked.
NOTICE:
- Be sure to ground the spark plugs when checking them.
- Do not crank the engine for more than 2 seconds.
- If an ignition coil assembly or spark plug has been struck or dropped, replace it.
HINT:
If spark does not occur, perform the following procedure.
(n) Connect the No. 6 engine wire connector and No. 7 engine wire connector (for Direct Injection).
(o) Connect the 2 No. 5 engine wire connectors (for Port Injection).
(p) Install the 6 spark plugs and 6 ignition coil assemblies.
Click here
(q) Install the intake air surge tank assembly.
Click here
(r) Turn the engine switch on (IG).
(s) Turn the Techstream on.
(t) Enter the following menus: Powertrain / Engine / Trouble Codes.
(u) Check for DTCs.
Powertrain > Engine > Trouble Codes(v) Clear the DTCs.
Powertrain > Engine > Clear DTCs2. INSPECT IGNITION COIL ASSEMBLY AND SPARK TEST
HINT:
Perform "Inspection After Repair" after replacing a spark plug or ignition coil assembly.
Click here
(a) Check that the ignition coil assembly connector is securely connected.
| Result | Action |
|---|---|
| NG | Connect securely |
| OK | Go to next step |
(b) Perform a spark test on each ignition coil assembly.
(1) Replace the ignition coil assembly with a known good one.
(2) Perform the spark test again.
| Result | Action |
|---|---|
| NG | Go to next step |
| OK | Replace ignition coil assembly |
NOTICE:
If an ignition coil assembly or spark plug has been struck or dropped, replace it.
(c) Perform a spark test on each spark plug.
(1) Replace the spark plug with a known good one.
(2) Perform the spark test again.
| Result | Action |
|---|---|
| NG | Inspect the ignition system |
| OK | Replace spark plug |
NOTICE:
If an ignition coil assembly or spark plug has been struck or dropped, replace it.
(d) Connect the No. 6 engine wire connector and No. 7 engine wire connector (for Direct Injection).
(e) Connect the 2 No. 5 engine wire connectors (for Port Injection).
(f) Install the 6 spark plugs and 6 ignition coil assemblies.
Click here
(g) Install the intake air surge tank assembly.
Click here
(h) Turn the engine switch on (IG).
(i) Turn the Techstream on.
(j) Enter the following menus: Powertrain / Engine / Trouble Codes.
(k) Check for DTCs.
Powertrain > Engine > Trouble Codes(l) Clear the DTCs.
Powertrain > Engine > Clear DTCs3. INSPECT SPARK PLUG
NOTICE:
- Do not damage the iridium tip and platinum tip.
- Check the iridium tip visually since the iridium tip may be damaged.
- Never attempt to adjust the electrode gap of a used spark plug.
- Replace with new spark plugs if extremely dirty due to sludge, etc.
- Replace with new spark plugs if damaged at all.
- Replace with a new spark plug if it has been struck or dropped.
- When replacing with a new spark plug, do not remove the cap for protecting the spark plug tip until it is installed to the engine.
HINT:
Perform "Inspection After Repair" after replacing a spark plug.
Click here
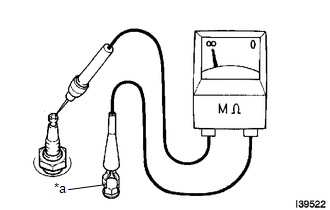
| (a) Check the electrode. (1) Using a megohmmeter, measure the insulation resistance. Standard Insulation Resistance:
HINT:
|
|
(b) Alternative inspection method.
(1) Start the engine.
NOTICE:
Do not perform this step when any of the following DTCs are output: P030000, P030027, P030085, P030100, P030200, P030300, P030400, P030500, P030600 (Cylinder Misfire Detected).
(2) Quickly accelerate the engine to 4000 rpm 5 times.
NOTICE:
Do not perform this step when any of the following DTCs are output: P030000, P030027, P030085, P030100, P030200, P030300, P030400, P030500, P030600 (Cylinder Misfire Detected).
(3) Remove the spark plug.
Click here
(4) Visually check the spark plug.
HINT:
If the electrode is dry, the spark plug is functioning properly. If the electrode is damp, proceed to the next step.
(c) Check the spark plug for any damage to its threads and insulator.
If there is any damage, replace the spark plug.
Recommended Spark Plug:
| Manufacturer | Spark Plug Type |
|---|---|
| DENSO | FK20HBR8 |
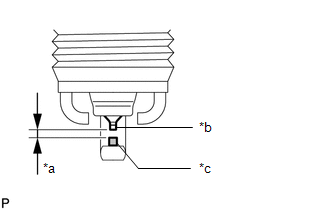
| (d) Check the spark plug electrode gap. Maximum Electrode Gap for Used Spark Plug: 1.1 mm (0.0433 in.) NOTICE: Never attempt to adjust the electrode gap of a used spark plug. If the electrode gap is more than the maximum, replace the spark plug. Standard Electrode Gap for New Spark Plug: 0.7 to 0.8 mm (0.0276 to 0.0315 in.) |
|
(e) Install the spark plug.
Click here
4. PERFORM INITIALIZATION
(a) Perform "Inspection After Repair" after replacing a spark plug or ignition coil assembly.
Click here
READ NEXT:
 Components
COMPONENTS ILLUSTRATION *1 KNOCK CONTROL SENSOR (for Bank 1) *2 KNOCK CONTROL SENSOR (for Bank 2) N*m (kgf*cm, ft.*lbf): Specified torque * For use with a union nut wrench
Removal
REMOVAL CAUTION / NOTICE / HINT The necessary procedures (adjustment, calibration, initialization or registration) that must be performed after parts are removed and installed, or replaced during knoc
SEE MORE:
Driving Mode Select switch
The driving modes can be selected
to suit driving condition.
Selecting the driving mode
Normal mode
Provides an optimal balance of fuel economy,
quietness, and dynamic performance.
Suitable for city driving.
Press the switch to change the normal
mode when not in normal mode.
Data List / Active Test
DATA LIST / ACTIVE TEST DATA LIST HINT: Using the Techstream to read the Data List allows the values or states of switches, sensors, actuators and other items to be read without removing any parts. This non-intrusive inspection can be very useful because intermittent conditions or signals may be dis
