Lexus ES: On-vehicle Inspection
ON-VEHICLE INSPECTION
CAUTION / NOTICE / HINT
HINT:
Refer to Problem Symptoms Table.
Click here .gif)
PROCEDURE
1. REMOVE FRONT WHEEL OPENING EXTENSION PAD LH
Click here
2. REMOVE FRONT WHEEL OPENING EXTENSION PAD RH
Click here
3. REMOVE NO. 1 ENGINE UNDER COVER
Click here
4. REMOVE NO. 3 ENGINE UNDER COVER
Click here
5. INSPECT REAR ENGINE MOUNTING INSULATOR
| (a) Disengage the clamp to separate the vacuum hose. |
|
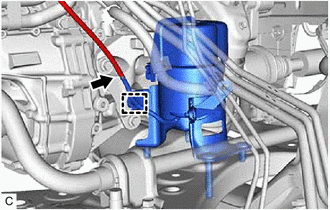
(b) Disconnect the vacuum hose.
| (c) Using a vacuum pump, apply vacuum of 80 kPa (600 mmHg, 23.6 in.Hg) and wait for 1 minute. |
|
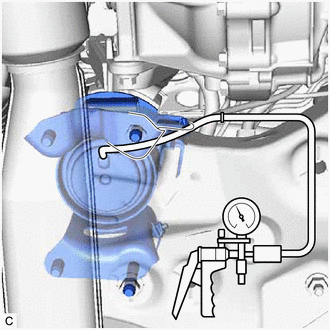
(d) Check that there is no change in the needle movement of the vacuum pump gauge.
OK:
Vacuum pressure holds.
(e) Check that there is no fluid leakage caused by a break in the diaphragm.
(f) Connect the vacuum hose.
(g) Engage the clamp to install the vacuum hose.
6. INSTALL NO. 3 ENGINE UNDER COVER
Click here
7. INSTALL NO. 1 ENGINE UNDER COVER
Click here
8. INSTALL FRONT WHEEL OPENING EXTENSION PAD LH
Click here
9. INSTALL FRONT WHEEL OPENING EXTENSION PAD RH
Click here
READ NEXT:
 Removal
REMOVAL CAUTION / NOTICE / HINT The necessary procedures (adjustment, calibration, initialization or registration) that must be performed after parts are removed and installed, or replaced during rear
Installation
INSTALLATION PROCEDURE 1. INSTALL REAR ENGINE MOUNTING INSULATOR (a) Engage the clamp and install the vacuum hose to the rear engine mounting insulator. (b) Install the wire harness clamp bracket to t
SEE MORE:
Left Front Wheel Speed Sensor Circuit Voltage Out of Range (C05001C)
DESCRIPTION Refer to DTC C050012 Click here DTC No. Detection Item DTC Detection Condition Trouble Area C05001C Left Front Wheel Speed Sensor Circuit Voltage Out of Range
When the vehicle is being driven in a straight line at a speed of 20 km/h (12 mph) or more and VSC/TRAC has
Pointer not Displayed on Screen or Pointer does not Move
CAUTION / NOTICE / HINT NOTICE:
Depending on the parts that are replaced during vehicle inspection or maintenance, performing initialization, registration or calibration may be needed. Refer to Precaution for Audio and Visual System.
Click here
When replacing the radio receiver assembly, alw
