Lexus ES: Installation
Lexus ES (XZ10) Service Manual / Vehicle Interior / Lighting (ext) / Rear Light Assembly / Installation
INSTALLATION
CAUTION / NOTICE / HINT
HINT:
- Use the same procedure for the RH side and LH side.
- The following procedure is for the LH side.
PROCEDURE
1. INSTALL REAR LIGHT ASSEMBLY
| (a) Engage the clip. |
|
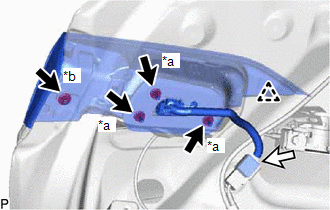
(b) Install the rear light assembly with the 3 nuts and cap nut.
Torque:
4.5 N·m {46 kgf·cm, 40 in·lbf}
(c) Connect the connector.
2. INSTALL LUGGAGE COMPARTMENT DOOR COVER
Click here .gif)
3. INSTALL SWITCH BEZEL (w/ Power Trunk Lid System)
Click here
4. INSTALL LUGGAGE LOCK CONTROL CABLE PLATE
Click here
READ NEXT:
 Relay
Relay
On-vehicle InspectionON-VEHICLE INSPECTION PROCEDURE 1. INSPECT H-LP LH RELAY (a) Measure the resistance according to the value(s) in the table below. Standard Resistance: Tester Connection Co
Components
COMPONENTS ILLUSTRATION *A w/o Panoramic View Monitor System *B w/ Panoramic View Monitor System *1 OUTER MIRROR *2 OUTER MIRROR COVER ASSEMBLY *3 OUTER MIRROR LOWER COVER
SEE MORE:
Components
COMPONENTS ILLUSTRATION *A for Gasoline Model 2WD *B for RH Side *C for LH Side - - *1 NO. 1 FLOOR UNDER COVER *2 NO. 2 FLOOR UNDER COVER N*m (kgf*cm, ft.*lbf): Specified torque - - ILLUSTRATION *A for 2WD - - *1 REAR COIL SPRING *2 REA
A25a-fks Oil And Oil Filter
Components
COMPONENTS
ILLUSTRATION
*1
CENTER NO. 4 ENGINE UNDER COVER
-
-
ILLUSTRATION
*1
OIL FILTER SUB-ASSEMBLY
*2
OIL FILLER CAP SUB-ASSEMBLY
*3
GASKET
© 2016-2026 Copyright www.lexguide.net
