Lexus ES: Installation
Lexus ES (XZ10) Service Manual / Vehicle Interior / Exterior Panels / Trim / Rocker Panel Moulding / Installation
INSTALLATION
CAUTION / NOTICE / HINT
HINT:
- Use the same procedure for the RH side and LH side.
- The following procedure is for the LH side.
PROCEDURE
1. INSTALL BODY ROCKER PANEL MOULDING ASSEMBLY
(a) Engage the 9 clips as shown in the illustration.
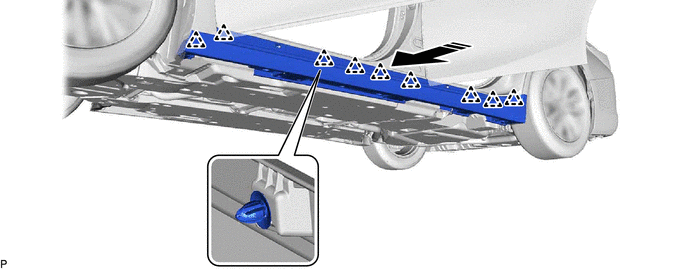
.png) | Install in this Direction | - | - |
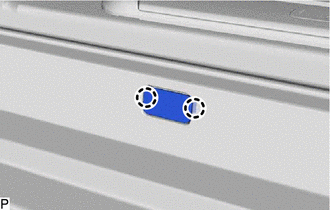
(b) Install the grommet.
(c) Install the 6 screws.
(d) Install the body rocker panel moulding assembly with 9 new clips.
2. INSTALL ROCKER PANEL MOULDING COVER
| (a) Engage the 2 claws to install the rocker panel moulding cover. HINT: Use the same procedure for the other rocker panel moulding cover. |
|
3. INSTALL NO. 2 ROCKER PANEL MOULDING PROTECTOR
Click here .gif)
READ NEXT:
 Roof Drip Side Finish Moulding
ComponentsCOMPONENTS ILLUSTRATION *1 CENTER ROOF DRIP SIDE FINISH MOULDING *2 NO. 1 ROOF DRIP SIDE FINISH MOULDING CLIP ● Non-reusable part - - RemovalREMOVAL CAUTION / NOTI
Components
COMPONENTS ILLUSTRATION *1 NO. 1 WINDSHIELD OUTSIDE MOULDING CLIP *2 NO. 3 WINDSHIELD OUTSIDE MOULDING CLIP *3 WINDSHIELD OUTSIDE MOULDING *4 WINDSHIELD GLASS SUB-ASSEMBLY ●
SEE MORE:
Data List / Active Test
DATA LIST / ACTIVE TEST DATA LIST HINT: Using the Techstream to read the Data List allows the values or states of switches, sensors, actuators and other items to be read without removing any parts. This non-intrusive inspection can be very useful because intermittent conditions or signals may be dis
Precaution
PRECAUTION PRECAUTION FOR DISCONNECTING CABLE FROM NEGATIVE AUXILIARY BATTERY TERMINAL NOTICE: When disconnecting the cable from the negative (-) auxiliary battery terminal, initialize the following systems after the cable is reconnected. System Name See Procedure Lane Control System (for H
© 2016-2026 Copyright www.lexguide.net
