Lexus ES: Installation
INSTALLATION
PROCEDURE
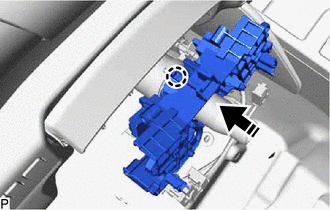
1. INSTALL STEERING WHEEL SWITCH HOUSING
(a) When reusing the steering wheel switch housing:
| (1) Using pliers, expand the clamp and temporarily install the steering wheel switch housing as shown in the illustration. |
|

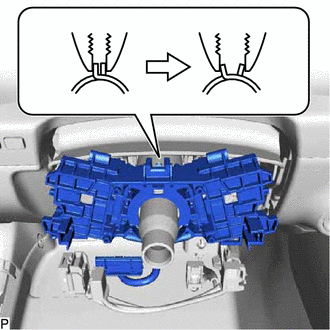
(2) While holding the clamp expanded, engage the claw as shown in the illustration.
.png) | Install in this Direction |
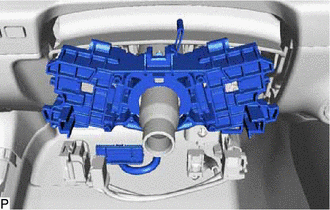
| (3) Release the clamp to install the steering wheel switch housing as shown in the illustration. |
|
(b) When installing a new steering wheel switch housing:
| (1) Temporarily install the steering wheel switch housing. |
|
(2) Engage the claw as shown in the illustration.

| | Install in this Direction |
(3) Remove the pin to install the steering wheel switch housing as shown in the illustration.
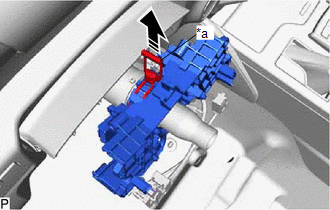
| *a | Pin |
| | Remove in this Direction |
2. INSTALL TURN SIGNAL SWITCH
Click here .gif)
3. INSTALL WINDSHIELD WIPER SWITCH ASSEMBLY
Click here
4. INSTALL TILT AND TELESCOPIC SWITCH (for Power Tilt and Power Telescopic Steering Column)
Click here
5. INSTALL SPIRAL CABLE WITH SENSOR SUB-ASSEMBLY
Click here
READ NEXT:
 Components
COMPONENTS ILLUSTRATION *A for Driver Side *B for Front Passenger Side *1 COURTESY LIGHT ASSEMBLY *2 FRONT DOOR TRIM BOARD SUB-ASSEMBLY *3 MULTIPLEX NETWORK MASTER SWITCH ASS
SEE MORE:
Low or High Power Supply Voltage (C1241)
DESCRIPTION If a malfunction is detected in the power supply circuit, the skid control ECU (brake booster with master cylinder assembly) power source voltage drops, or there is insufficient voltage to operate the main relay, the skid control ECU (brake booster with master cylinder assembly) will sto
How To Proceed With Troubleshooting
CAUTION / NOTICE / HINT HINT:
Use the following procedure to troubleshoot the sliding roof system.
*: Use the Techstream.
PROCEDURE 1. VEHICLE BROUGHT TO WORKSHOP
NEXT 2. CUSTOMER PROBLEM ANALYSIS HINT:
In troubleshooting, confirm that the problem sympto
