Lexus ES: Components
Lexus ES (XZ10) Service Manual / Vehicle Exterior / Mirror (ext) / Outer Mirror Control Ecu / Components
COMPONENTS
ILLUSTRATION
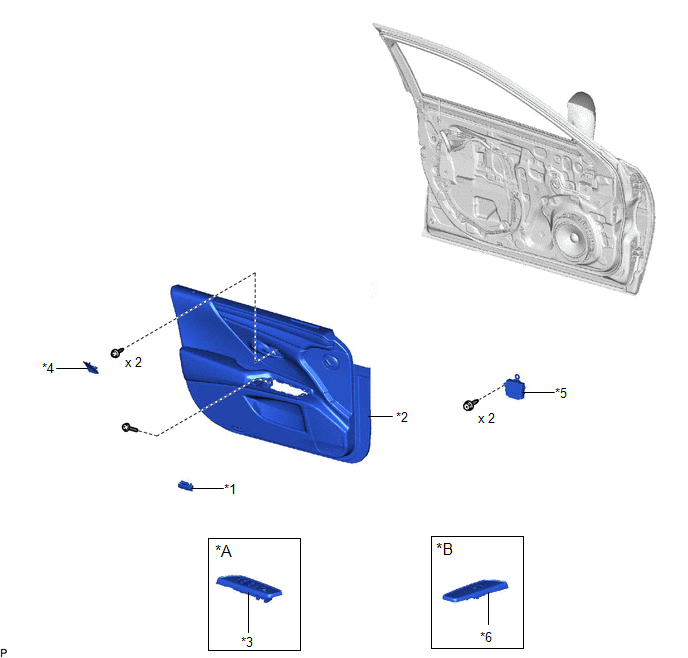
| *A | for Driver Side | *B | for Front Passenger Side |
| *1 | COURTESY LIGHT ASSEMBLY | *2 | FRONT DOOR TRIM BOARD SUB-ASSEMBLY |
| *3 | MULTIPLEX NETWORK MASTER SWITCH ASSEMBLY WITH FRONT DOOR UPPER ARMREST BASE PANEL | *4 | NO. 2 DOOR TRIM PAD |
| *5 | OUTER MIRROR CONTROL ECU ASSEMBLY | *6 | POWER WINDOW REGULATOR SWITCH ASSEMBLY WITH FRONT DOOR UPPER ARMREST BASE PANEL |
READ NEXT:
 Removal
REMOVAL CAUTION / NOTICE / HINT HINT:
Use the same procedure for the RH side and LH side.
The following procedure is for the LH side.
PROCEDURE 1. REMOVE NO. 2 DOOR TRIM PAD Click here 2.
Installation
INSTALLATION CAUTION / NOTICE / HINT HINT:
Use the same procedure for the RH side and LH side.
The following procedure is for the LH side.
PROCEDURE 1. INSTALL OUTER MIRROR CONTROL ECU ASSEMBL
SEE MORE:
Mirror Heater does not Operate with Rear Defogger Switch
DESCRIPTION When the mirror heater switch (rear window defogger switch) is operated, the mirror heater signal is sent to the air conditioning amplifier assembly and then to each outer mirror control ECU assembly via CAN communication. Based on this signal, the outer mirror control ECU assemblies ope
Jam Protection Function does not Operate
DESCRIPTION This symptom may occur for any of the power windows. The jam protection function operates within a specified range during the manual up or auto up operation. CAUTION / NOTICE / HINT NOTICE:
If a power window regulator motor assembly has been replaced with a new one, initialize the pow
© 2016-2026 Copyright www.lexguide.net
