Lexus ES: Installation
Lexus ES (XZ10) Service Manual / Audio & Visual & Telematics / Cellular Communication / Back-up Battery / Installation
INSTALLATION
PROCEDURE
1. INSTALL BACK-UP BATTERY
(a) Connect the connector and install the back-up battery with the "TOP" mark facing upward as shown in the illustration.
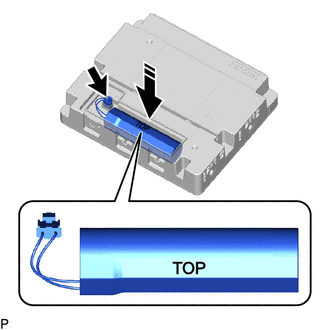
.png) | Install in this Direction |
NOTICE:
Make sure that the connector is connected securely.
(b) Engage the 2 guides and 3 claws as shown in the illustration to install the transceiver cover.
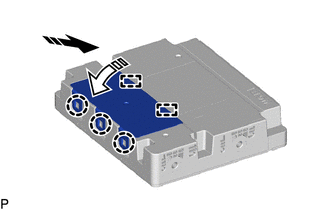
| | Install in this Direction (1) |
.png) | Install in this Direction (2) |
NOTICE:
Make sure that the transceiver cover is securely installed.
2. INSTALL DCM (TELEMATICS TRANSCEIVER) WITH BRACKET
Click here .gif)
3. PERFORM INITIALIZATION
for HV Model: Click here
for Gasoline Model: Click here
READ NEXT:
 Removal
REMOVAL CAUTION / NOTICE / HINT The necessary procedures (adjustment, calibration, initialization, or registration) that must be performed after parts are removed and installed, or replaced during bac
Components
COMPONENTS ILLUSTRATION *1 CENTER INSTRUMENT CLUSTER FINISH PANEL SUB-ASSEMBLY *2 INSTRUMENT PANEL FINISH PANEL END LH *3 INSTRUMENT PANEL FINISH PANEL END RH *4 REAR UPPER CONSOLE
SEE MORE:
Steering Angle Sensor Power Source Voltage (C1432)
DESCRIPTION The skid control ECU (brake booster with master cylinder assembly) outputs this DTC when it receives a sensor power source malfunction signal from the steering angle sensor. DTC No. Detection Item INF Code DTC Detection Condition Trouble Area MIL Note C1432 Steering
Diagnosis System
DIAGNOSIS SYSTEM DESCRIPTION (a) The hybrid vehicle control ECU has a self-diagnosis system. If the computer, hybrid control system, or a component is not working properly, the ECU records the conditions that relate to the fault. The ECU also illuminates the master warning light in the combination m
© 2016-2026 Copyright www.lexguide.net
