Lexus ES: Installation
Lexus ES (XZ10) Service Manual / Vehicle Exterior / Lighting (ext) / Headlight Dimmer Switch / Installation
INSTALLATION
PROCEDURE
1. INSTALL TURN SIGNAL SWITCH
(a) Engage the claw as shown in the illustration.
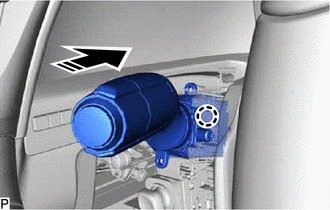
.png) | Install in this Direction |
(b) Install the turn signal switch with the 2 screws.
2. INSTALL UPPER STEERING COLUMN COVER
Click here .gif)
3. INSTALL LOWER STEERING COLUMN COVER SUB-ASSEMBLY
Click here
4. CUSTOMIZE POWER TILT AND POWER TELESCOPIC STEERING COLUMN SYSTEM (for Power Tilt and Power Telescopic Steering Column)
Click here
READ NEXT:
 Components
COMPONENTS ILLUSTRATION *1 HEADLIGHT ECU SUB-ASSEMBLY *2 HEADLIGHT GASKET ● Non-reusable part - -
Removal
REMOVAL CAUTION / NOTICE / HINT The necessary procedures (adjustment, calibration, initialization or registration) that must be performed after parts are removed and installed, or replaced during head
SEE MORE:
Replacement
REPLACEMENT CAUTION / NOTICE / HINT CAUTION: To avoid the danger of being burned, do not remove the reserve tank cap or drain cock plug while the coolant (for inverter) is still hot. Pressurized, hot coolant (for inverter) and steam may be released and cause serious burns. *1 Reserve Tank Cap
Lost Communication with Brake System Control Module (U0129,U0140,U0293)
DESCRIPTION These DTCs are stored when the CAN communication system is malfunctioning. DTC No. Detection Item DTC Detection Condition Trouble Area U0129 Lost Communication with Brake System Control Module The vehicle approaching speaker controller does not receive data from the skid
© 2016-2026 Copyright www.lexguide.net
