
Lexus ES: Installation
Lexus ES (XZ10) Service Manual / Audio & Visual & Telematics / Audio / Video / Noise Filter / Installation
INSTALLATION
PROCEDURE
1. INSTALL RADIO SETTING CONDENSER
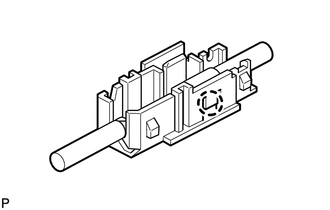
| (a) Engage the claw to install a new terminal cover to the wire harness. NOTICE:
|
|
(b) Engage the 3 claws to install the new terminal cover with wire harness to a new condenser as shown in the illustration.
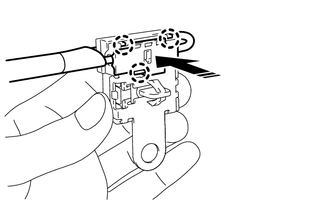
.png) | Install in this Direction |
NOTICE:
- Do not use excessive force when inserting the terminal cover into the condenser.
- If the terminal cover has been deformed during installation, replace the terminal, terminal cover and condenser with new ones.
(c) Engage the clamp to temporarily install a new radio setting condenser with wire harness.
(d) Install the new radio setting condenser with the bolt.
2. INSTALL ROOF SIDE INNER GARNISH ASSEMBLY LH
Click here .gif)
3. INSTALL REAR SEAT SIDE GARNISH LH
Click here
4. INSTALL REAR DOOR SCUFF PLATE LH
for HV Model: Click here
for Gasoline Model: Click here
5. INSTALL REAR SEAT ASSEMBLY
Click here
READ NEXT:
 On-vehicle Inspection
ON-VEHICLE INSPECTION PROCEDURE 1. INSPECT RADIO SETTING CONDENSER (a) With the radio setting condenser installed, check that there is no looseness or other abnormalities. (b) Measure the resistanc
Removal
REMOVAL CAUTION / NOTICE / HINT The necessary procedures (adjustment, calibration, initialization, or registration) that must be performed after parts are removed and installed, or replaced during rad
SEE MORE:
Components
COMPONENTS ILLUSTRATION *1 NO. 1 WINDSHIELD OUTSIDE MOULDING CLIP *2 NO. 3 WINDSHIELD OUTSIDE MOULDING CLIP *3 WINDSHIELD OUTSIDE MOULDING *4 WINDSHIELD GLASS SUB-ASSEMBLY ● Non-reusable part - -
Lost Communication with Wiper ECU LIN (B1245)
DESCRIPTION The main body ECU (multiplex network body ECU) and windshield wiper motor assembly communicate via LIN communication. The main body ECU (multiplex network body ECU) stores this DTC if communication becomes abnormal. DTC No. Detection Item DTC Detection Condition Trouble Area M
© 2016-2026 Copyright www.lexguide.net
