Lexus ES: A25a-fxs Air Cleaner Filter Element
Components
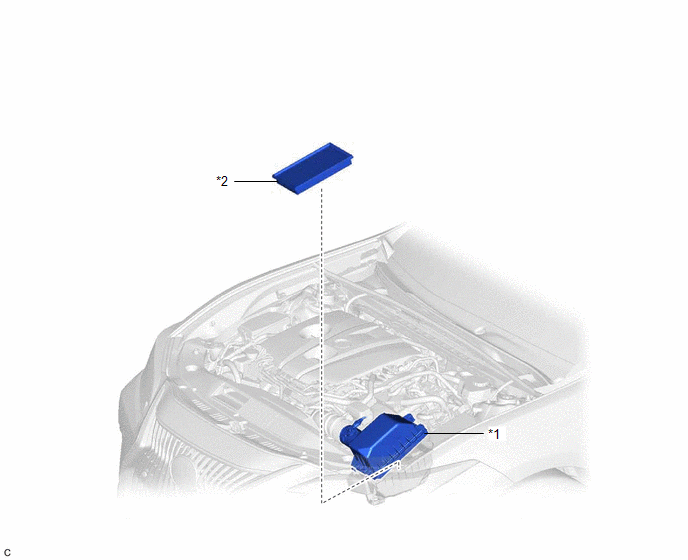
COMPONENTS
ILLUSTRATION
|
*1 |
AIR CLEANER CAP SUB-ASSEMBLY |
*2 |
AIR CLEANER FILTER ELEMENT SUB-ASSEMBLY |
Removal
REMOVAL
PROCEDURE
1. SEPARATE AIR CLEANER CAP SUB-ASSEMBLY
|
(a) Disengage the 2 air cleaner cap clamps. |
|

(b) Disengage the 2 guides to separate the air cleaner cap sub-assembly from the air cleaner case sub-assembly.
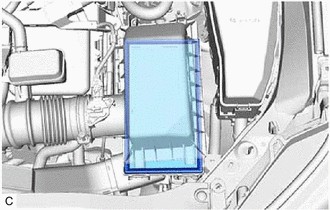
2. REMOVE AIR CLEANER FILTER ELEMENT SUB-ASSEMBLY
|
(a) Remove the air cleaner filter element sub-assembly from the air cleaner case sub-assembly. NOTICE: Do not allow foreign matter to enter the air cleaner cap sub-assembly and air cleaner case sub-assembly. |
|
3. INSPECT AIR CLEANER FILTER ELEMENT SUB-ASSEMBLY
HINT:
This procedure is only performed when the air cleaner filter element sub-assembly will be reused.
(a) Check whether the air cleaner filter element sub-assembly is dirty or clogged.
|
(b) If the air cleaner filter element sub-assembly is dirty or has foreign matter adhered to it, clean the air cleaner filter element sub-assembly with compressed air. NOTICE: When cleaning the air cleaner filter element sub-assembly, blow the compressed air from the intake downstream side (from the air cleaner cap sub-assembly side). HINT: If the air cleaner filter element sub-assembly is still extremely dirty after cleaning it, replace the air cleaner filter element sub-assembly with a new one. |
|
.png)
Installation
INSTALLATION
PROCEDURE
1. INSTALL AIR CLEANER FILTER ELEMENT SUB-ASSEMBLY
(a) Check that the inside of the air cleaner case sub-assembly does not have dirt or deposits, and clean them away if they are present.
(b) Install the air cleaner filter element sub-assembly to the air cleaner case sub-assembly.
2. INSTALL AIR CLEANER CAP SUB-ASSEMBLY
(a) Engage the 2 guides to install the air cleaner cap sub-assembly to the air cleaner case sub-assembly.
(b) Engage the 2 air cleaner cap clamps.
READ NEXT:
 Components
COMPONENTS
ILLUSTRATION
*1
AUXILIARY BATTERY
*2
BATTERY HOSE
*3
NEGATIVE AUXILIARY BATTERY TERMINAL
*4
Removal
REMOVAL
CAUTION / NOTICE / HINT
The necessary procedures (adjustment, calibration, initialization or registration)
that must be performed after parts are removed and installed, or replaced during
SEE MORE:
Absorber Control Actuator(for Rear Side)
On-vehicle InspectionON-VEHICLE INSPECTION PROCEDURE 1. INSPECT ABSORBER CONTROL ACTUATOR (a) Measure the resistance according to the value(s) in the table below. Standard Resistance: Tester Connection Condition Specified Condition 1 - 3 15 to 25°C 3.3 to 3.7 Ω If the result
Headlight Swivel Motor LH (B2412,B2413,B2417,B2418)
DESCRIPTION The headlight ECU sub-assembly LH sends automatic headlight beam level control signals to each headlight swivel motor and headlight leveling motor via LIN communication. Each headlight ECU sub-assembly and headlight swivel motor and headlight leveling motor communicate via LIN communicat
