Lexus ES: Inspection
INSPECTION
PROCEDURE
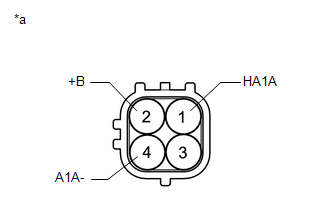
1. INSPECT AIR FUEL RATIO SENSOR (for Bank 1)
| (a) Measure the resistance according to the value(s) in the table below. Standard Resistance:
If the result is not as specified, replace the air fuel ratio sensor. |
|
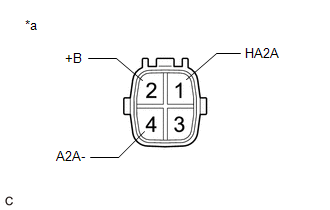
2. INSPECT AIR FUEL RATIO SENSOR (for Bank 2)
| (a) Measure the resistance according to the value(s) in the table below. Standard Resistance:
If the result is not as specified, replace the air fuel ratio sensor. |
|
READ NEXT:
 Installation
INSTALLATION PROCEDURE 1. INSTALL AIR FUEL RATIO SENSOR (for Bank 1) HINT: Perform "Inspection After Repair" after replacing the air fuel ratio sensor. Click here (a) Using SST, install the air
Components
COMPONENTS ILLUSTRATION *1 FRONT FENDER APRON SEAL RH *2 V-BANK COVER SUB-ASSEMBLY N*m (kgf*cm, ft.*lbf): Specified torque - - ILLUSTRATION *1 CAMSHAFT TIMING OIL CONTROL
SEE MORE:
Check Bus 2 Line for Short to GND
DESCRIPTION There may be a short circuit between one of the CAN bus lines and GND when there is no resistance between terminal 18 (CA4H) of the central gateway ECU (network gateway ECU) and terminal 4 (CG) of the DLC3, or terminal 17 (CA4L) of the central gateway ECU (network gateway ECU) and termin
Left Headlight ECU Variation Error (B2456)
DESCRIPTION This DTC is stored if the headlight ECU sub-assembly LH for another destination is installed. AFS*1 DTC No. Detection Item DTC Detection Condition Trouble Area DTC Output from B2456 Left Headlight ECU Variation Error
The power switch is on (IG).
Vehicle specif
