Lexus ES: Components
Lexus ES (XZ10) Service Manual / Vehicle Interior / Lighting (ext) / Height Control Sensor / Components
COMPONENTS
ILLUSTRATION
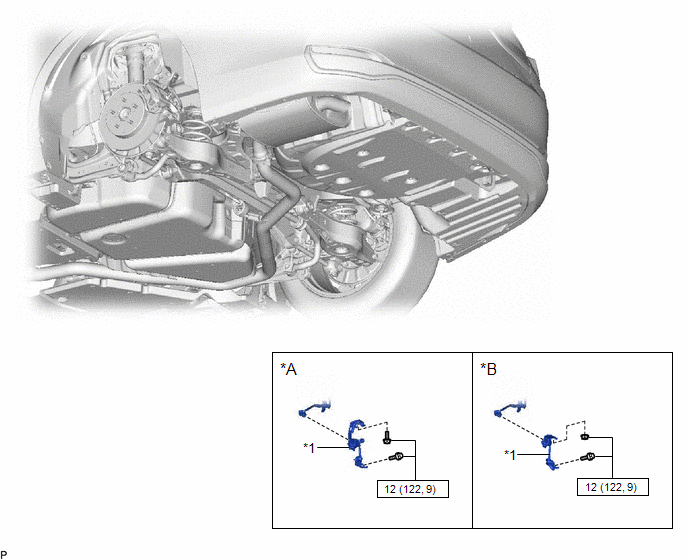
| *A | for 2WD | *B | for AWD |
| *1 | REAR HEIGHT CONTROL SENSOR SUB-ASSEMBLY LH | - | - |
.png) | N*m (kgf*cm, ft.*lbf): Specified torque | - | - |
READ NEXT:
 Removal
REMOVAL CAUTION / NOTICE / HINT The necessary procedures (adjustment, calibration, initialization or registration) that must be performed after parts are removed and installed, or replaced during rear
Inspection
INSPECTION PROCEDURE 1. INSPECT REAR HEIGHT CONTROL SENSOR SUB-ASSEMBLY LH (for 2WD) (a) Preparation for check (1) Confirm the standard, high and low positions of the link that will be used in the fol
Installation
INSTALLATION PROCEDURE 1. INSTALL REAR HEIGHT CONTROL SENSOR SUB-ASSEMBLY LH NOTICE: If the rear height control sensor sub-assembly LH has been struck or dropped, replace it with a new one. (a) for 2W
SEE MORE:
Removal
REMOVAL CAUTION / NOTICE / HINT HINT:
Use the same procedure for the RH side and LH side.
The following procedure is for the LH side.
PROCEDURE 1. REMOVE WINDSHIELD OUTSIDE MOULDING LH (a) Apply protective tape around the windshield outside moulding as shown in the illustration. Prote
Removal
REMOVAL CAUTION / NOTICE / HINT The necessary procedures (adjustment, calibration, initialization or registration) that must be performed after parts are removed and installed, or replaced during HV battery removal/installation are shown below. Necessary Procedures After Parts Removed/Installed/Repl
© 2016-2026 Copyright www.lexguide.net
