
Lexus ES: Removal
REMOVAL
CAUTION / NOTICE / HINT
HINT:
- Use the same procedure for the RH side and LH side.
- The following procedure is for the LH side.
PROCEDURE
1. REMOVE WINDSHIELD OUTSIDE MOULDING LH
(a) Apply protective tape around the windshield outside moulding as shown in the illustration.
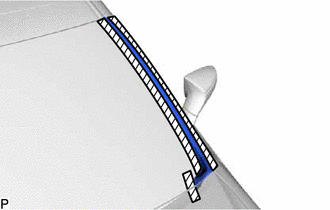
.png) | Protective Tape |
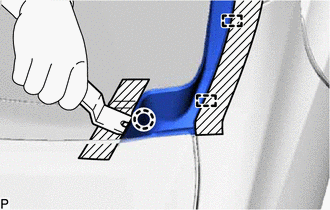
| (b) Using a moulding remover, disengage the claw and 2 guides. |
|
(c) Using a screwdriver with its tip wrapped with protective tape, disengage the 10 claws as shown in the illustration.
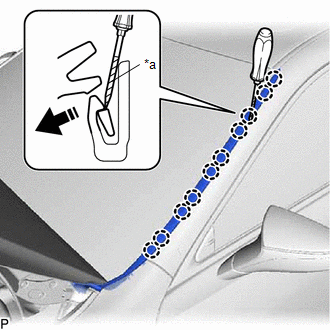
| *a | Protective Tape |
.png) | Remove in this Direction |
2. REMOVE NO. 1 WINDSHIELD OUTSIDE MOULDING CLIP
HINT:
Perform the following procedure only when replacement of a No. 1 windshield outside moulding clip is necessary.
(a) Disengage the 5 claws to remove the 5 No. 1 windshield outside moulding clips as shown in the illustration.
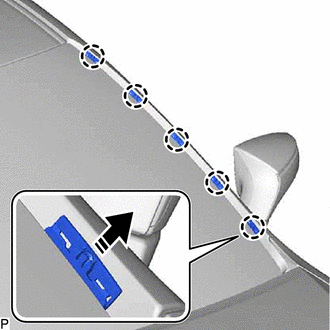
| | Remove in this Direction |
3. REMOVE NO. 3 WINDSHIELD OUTSIDE MOULDING CLIP
HINT:
Perform the following procedure only when replacement of a No. 3 windshield outside moulding clip is necessary.
(a) Remove the windshield glass sub-assembly.
Click here .gif)
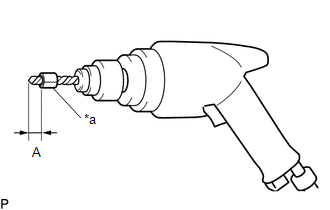
(b) Insert a 4.0 mm (0.157 in.) drill bit into a drill.
| (c) Tape the 4.0 mm (0.157 in.) drill bit 5.0 mm (0.197 in.) from the tip as shown in the illustration. Standard Measurement:
NOTICE: Tape the 4.0 mm (0.157 in.) drill bit to prevent the drill bit from going too deep. |
|
| (d) Lightly press the drill bit against the No. 3 windshield outside moulding clips to drill off the No. 3 windshield outside moulding clip flanges, and remove the 5 No. 3 windshield outside moulding clips. CAUTION: Be careful of the drilled No. 3 windshield outside moulding clips, as they may be hot. NOTICE:
|
|
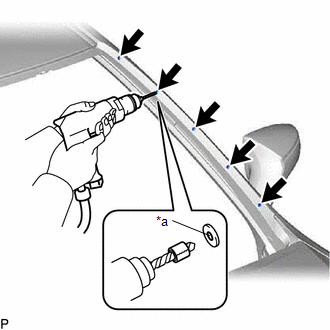
(e) Using a vacuum cleaner, remove the No. 3 windshield outside moulding clip fragments and shavings from the drilled areas.
READ NEXT:
 Installation
INSTALLATION CAUTION / NOTICE / HINT HINT:
Use the same procedure for the RH side and LH side.
The following procedure is for the LH side.
PROCEDURE 1. INSTALL NO. 3 WINDSHIELD OUTSIDE MOULDIN
Horn
ComponentsCOMPONENTS ILLUSTRATION *1 COOL AIR INTAKE DUCT SEAL *2 HIGH PITCHED HORN ASSEMBLY *3 LOW PITCHED HORN ASSEMBLY - - N*m (kgf*cm, ft.*lbf): Specified torque -
SEE MORE:
Parts Location
PARTS LOCATION ILLUSTRATION *A w/o AVS - - *1 FRONT AXLE HUB SUB-ASSEMBLY RH - FRONT SPEED SENSOR ROTOR RH *2 FRONT SPEED SENSOR RH *3 FRONT AXLE HUB SUB-ASSEMBLY LH - FRONT SPEED SENSOR ROTOR LH *4 FRONT SPEED SENSOR LH *5 REAR AXLE HUB AND BEARING ASSEMBLY RH -
Cruise Control System Internal Failure (P057504,P057549)
DESCRIPTION When the ECM detects an internal malfunction, DTC P057504 or P057549 is stored. DTC No. Detection Item DTC Detection Condition Trouble Area MIL DTC Output from P057504 Cruise Control System Internal Failure When the dynamic radar cruise control system is operating, t
