
Lexus ES: Components
Lexus ES (XZ10) Service Manual / Vehicle Interior / Exterior Panels / Trim / Rear Spoiler / Components
COMPONENTS
ILLUSTRATION
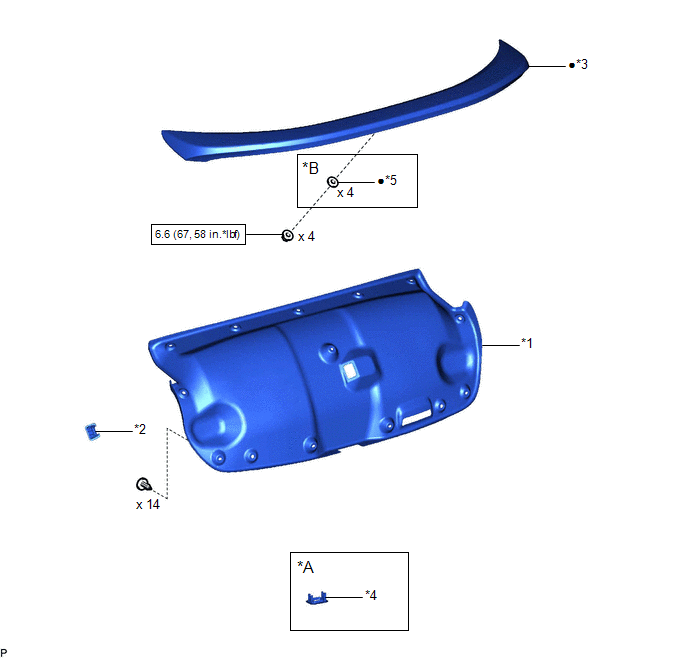
| *A | w/ Power Trunk Lid System | *B | for TMMK Made |
| *1 | LUGGAGE COMPARTMENT DOOR COVER | *2 | LUGGAGE LOCK CONTROL CABLE PLATE |
| *3 | REAR SPOILER SUB-ASSEMBLY | *4 | SWITCH BEZEL |
| *5 | GASKET | - | - |
.png) | N*m (kgf*cm, ft.*lbf): Specified torque | ● | Non-reusable part |
READ NEXT:
 Removal
REMOVAL PROCEDURE 1. REMOVE LUGGAGE LOCK CONTROL CABLE PLATE Click here 2. REMOVE SWITCH BEZEL (w/ Power Trunk Lid System) Click here 3. REMOVE LUGGAGE COMPARTMENT DOOR COVER Click here 4. REMOV
Installation
INSTALLATION PROCEDURE 1. INSTALL REAR SPOILER SUB-ASSEMBLY HINT: When installing a new rear spoiler sub-assembly, heat the luggage compartment door panel and rear spoiler sub-assembly using a heat li
Rear Wheel House Plate
ComponentsCOMPONENTS ILLUSTRATION *1 NO. 2 ROCKER PANEL MOULDING PROTECTOR *2 CLIP ● Non-reusable part - - RemovalREMOVAL CAUTION / NOTICE / HINT HINT:
Use the same proce
SEE MORE:
Intake System
On-vehicle InspectionON-VEHICLE INSPECTION CAUTION / NOTICE / HINT The necessary procedures (adjustment, calibration, initialization or registration) that must be performed after parts are removed and installed, or replaced when repairing air leaks in the intake system are shown below. Necessary Pr
Reassembly
REASSEMBLY PROCEDURE 1. INSTALL VACUUM WARNING SWITCH ASSEMBLY (a) Install a new check valve grommet to the brake booster assembly. (b) Install the vacuum warning switch assembly to the brake booster assembly as shown in the illustration. *a 30° +/- 20° Up 2. INSTALL BRAKE VACUUM C
© 2016-2026 Copyright www.lexguide.net
