Lexus ES: Rear Wheel House Plate
Components
COMPONENTS
ILLUSTRATION
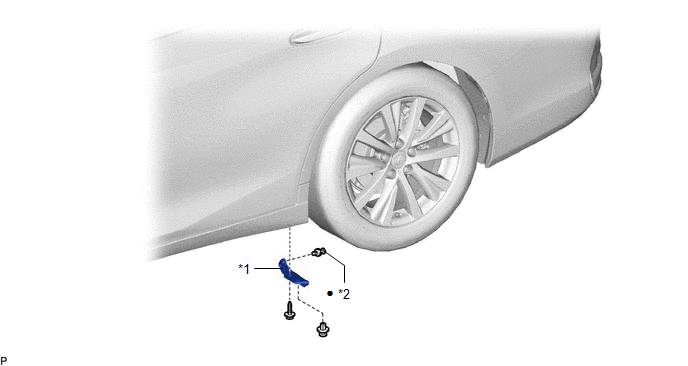
| *1 | NO. 2 ROCKER PANEL MOULDING PROTECTOR | *2 | CLIP |
| ● | Non-reusable part | - | - |
Removal
REMOVAL
CAUTION / NOTICE / HINT
HINT:
- Use the same procedure for the RH side and LH side.
- The following procedure is for the LH side.
PROCEDURE
1. REMOVE NO. 2 ROCKER PANEL MOULDING PROTECTOR
| (a) Remove the 2 clips. |
|
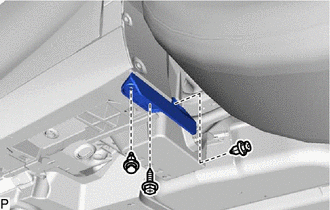
(b) Remove the screw and No. 2 rocker panel moulding protector.
Installation
INSTALLATION
CAUTION / NOTICE / HINT
HINT:
- Use the same procedure for the RH side and LH side.
- The following procedure is for the LH side.
PROCEDURE
1. INSTALL NO. 2 ROCKER PANEL MOULDING PROTECTOR
| (a) Temporarily install the No. 2 rocker panel moulding protector with the screw. |
|
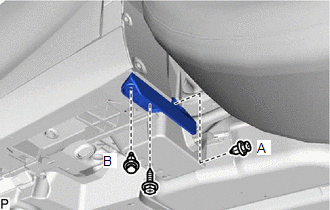
(b) Install a new clip (A).
(c) Install the No. 2 rocker panel moulding protector with the clip (B).
READ NEXT:
 Components
COMPONENTS ILLUSTRATION *1 BODY ROCKER PANEL MOULDING ASSEMBLY *2 NO. 2 ROCKER PANEL MOULDING PROTECTOR *3 ROCKER PANEL MOULDING COVER *4 CLIP ● Non-reusable part - -
Removal
REMOVAL CAUTION / NOTICE / HINT HINT:
Use the same procedure for the RH side and LH side.
The following procedure is for the LH side.
PROCEDURE 1. REMOVE NO. 2 ROCKER PANEL MOULDING PROTECTOR
SEE MORE:
Components
COMPONENTS ILLUSTRATION *1 REAR DRIVE SHAFT ASSEMBLY LH *2 REAR DRIVE SHAFT INBOARD JOINT SHAFT SNAP RING LH *3 REAR DIFFERENTIAL CARRIER ASSEMBLY - - Toyota Genuine Differential Gear Oil LT 75W-85 API GL-5 MP grease Do not apply lubricants to the threaded part
How To Proceed With Troubleshooting
CAUTION / NOTICE / HINT HINT:
Use the following procedure to troubleshoot the luggage compartment door opener system.
*: Use the Techstream.
PROCEDURE 1. VEHICLE BROUGHT TO WORKSHOP
NEXT 2. CUSTOMER PROBLEM ANALYSIS HINT:
In troubleshooting, confirm that
© 2016-2026 Copyright www.lexguide.net
