Lexus ES: Components
COMPONENTS
ILLUSTRATION
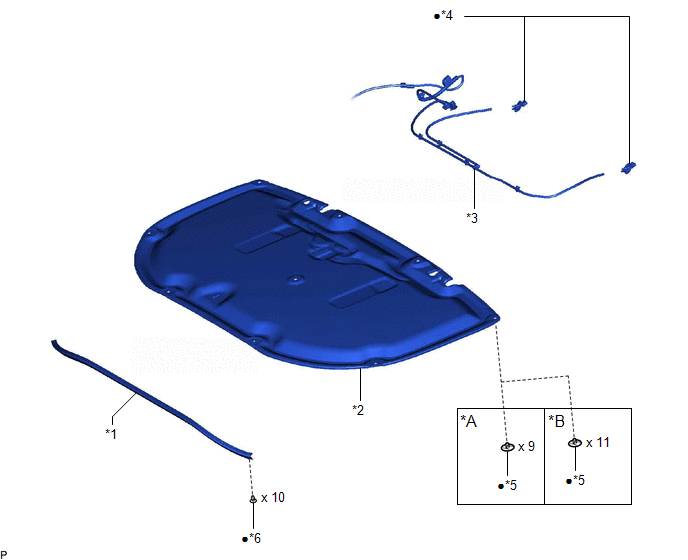
| *A | for TMK Made | *B | for TMMK Made |
| *1 | HOOD CUSHION CENTER | *2 | HOOD INSULATOR |
| *3 | WASHER HOSE ASSEMBLY | *4 | WASHER NOZZLE SUB-ASSEMBLY |
| *5 | HOOD INSULATOR CLIP | *6 | HOOD TO COWL TOP SEAL CLIP |
| ● | Non-reusable part | - | - |
ILLUSTRATION

| *1 | HOOD STAY BRACKET LH | *2 | HOOD STAY BRACKET RH |
| *3 | HOOD SUPPORT ASSEMBLY LH | *4 | HOOD SUPPORT ASSEMBLY RH |
.png) | N*m (kgf*cm, ft.*lbf): Specified torque | - | - |
READ NEXT:
 On-vehicle Inspection
ON-VEHICLE INSPECTION PROCEDURE 1. INSPECT HOOD SUB-ASSEMBLY (a) Check that the clearance measurements of areas a through d are within each standard range. Standard Clearance Area Measurement
Disassembly
DISASSEMBLY PROCEDURE 1. REMOVE HOOD CUSHION CENTER (a) Using a clip remover, disengage the 10 hood to cowl top seal clips to remove the hood cushion center. (b) Remove the 10 hood to c
Adjustment
ADJUSTMENT CAUTION / NOTICE / HINT *a Centering Bolt *b Standard Bolt HINT:
Centering bolts are used to install the hood hinges and hood lock. The hood and hood lock cannot be adjust
SEE MORE:
Dtc Check / Clear
DTC CHECK / CLEAR CHECK DTC (a) Connect the Techstream to the DLC3. (b) Start the engine. (c) Turn the Techstream on. (d) Enter the following menus: Chassis / Circumference Monitoring Camera Control Module / Trouble Codes. (e) Check the details of the DTCs. Chassis > Circumference Monitoring Came
Stop Lamp Relay Actuator Stuck On (C13807E)
DESCRIPTION When any of the following conditions are met, the skid control ECU (brake actuator assembly) sets the drive output (STPO) ON which operates the stop light control relay (stop light switch assembly) and turns on the stop lights. Illumination Conditions:
Pre-collision brake is operating
© 2016-2026 Copyright www.lexguide.net
