Lexus ES: Components
Lexus ES (XZ10) Service Manual / Engine & Hybrid System / A25a-fxs (emission Control) / Canister / Components
COMPONENTS
ILLUSTRATION
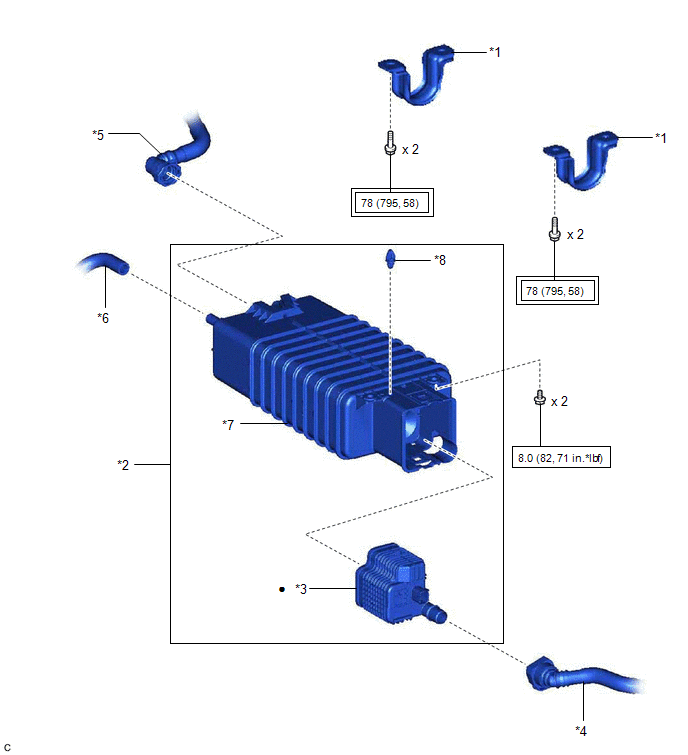
| *1 | REAR NO. 1 STABILIZER BAR BRACKET | *2 | CANISTER (CHARCOAL CANISTER ASSEMBLY) |
| *3 | LEAK DETECTION PUMP SUB-ASSEMBLY | *4 | FUEL TANK VENT HOSE SUB-ASSEMBLY |
| *5 | FUEL TANK VENT HOSE | *6 | PURGE LINE HOSE |
| *7 | CHARCOAL CANISTER SUB-ASSEMBLY | *8 | CLIP |
.png) | Tightening torque for "Major areas involving basic vehicle performance such as moving/turning/stopping": N*m (kgf*cm, ft.*lbf) | .png) | N*m (kgf*cm, ft.*lbf): Specified torque |
| ● | Non-reusable part | - | - |
READ NEXT:
 Removal
REMOVAL PROCEDURE 1. REMOVE REAR NO. 1 STABILIZER BAR BRACKET (a) Remove the 4 bolts and 2 rear No. 1 stabilizer bar brackets from the vehicle body. 2. REMOVE CANISTER (CHARCOAL CANISTE
Inspection
INSPECTION PROCEDURE 1. INSPECT CANISTER (CHARCOAL CANISTER ASSEMBLY) (a) Visually check the canister (charcoal canister assembly). (1) Visually check the canister (charcoal canister assembly) for
Installation
INSTALLATION PROCEDURE 1. INSTALL LEAK DETECTION PUMP SUB-ASSEMBLY HINT: Only perform this procedure when replacement of the leak detection pump sub-assembly is necessary. (a) Engage the 2 claws to
SEE MORE:
EVAP System Tank Vapor Line Restricted/Blocked (P00FE00)
DTC SUMMARY DTC No. Detection Item DTC Detection Condition Trouble Area MIL Memory Note P00FE00 EVAP System Tank Vapor Line Restricted/Blocked Leak detection pump creates negative pressure (vacuum) in EVAP system and EVAP system pressure is measured. When the fuel level in the
Disassembly
DISASSEMBLY PROCEDURE 1. REMOVE MOTOR COVER (a) Disconnect the connector. (b) Disengage the 2 clamps. (c) Disengage the 4 claws to remove the motor cover as shown in the illustration. Remove in this Direction 2. REMOVE SWING GRILLE ACTUATOR ASSEMBLY (a) Remove the swing gril
© 2016-2026 Copyright www.lexguide.net
