
Lexus ES: Components
COMPONENTS
ILLUSTRATION
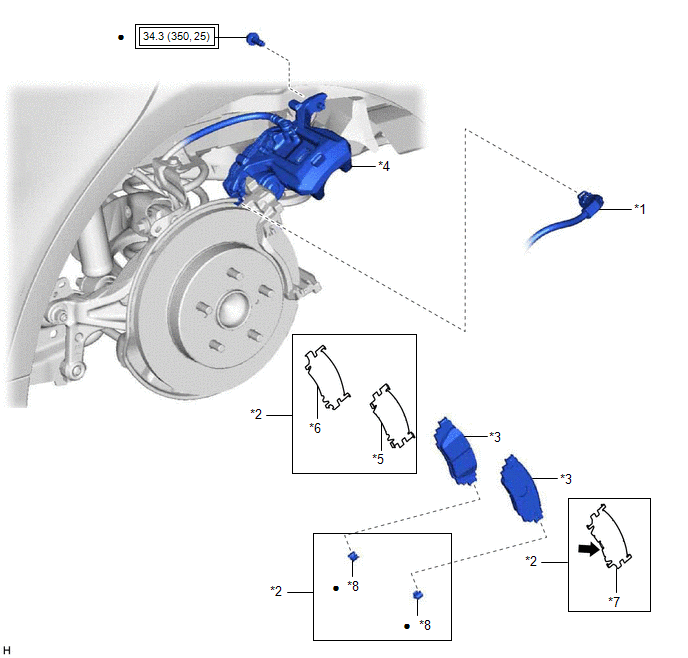
|
*1 |
NO. 2 PARKING BRAKE WIRE ASSEMBLY |
*2 |
REAR DISC BRAKE ANTI-SQUEAL SHIM KIT |
|
*3 |
REAR DISC BRAKE PAD |
*4 |
REAR DISC BRAKE CYLINDER ASSEMBLY |
|
*5 |
REAR NO. 1 DISC BRAKE ANTI-SQUEAL SHIM |
*6 |
REAR NO. 2 DISC BRAKE ANTI-SQUEAL SHIM |
|
*7 |
REAR DISC BRAKE ANTI-SQUEAL SHIM |
*8 |
REAR DISC BRAKE PAD WEAR INDICATOR PLATE |
.png) |
Tightening torque for "Major areas involving basic vehicle performance such as moving/turning/stopping": N*m (kgf*cm, ft.*lbf) |
● |
Non-reusable part |
.png) |
Disc brake grease |
- |
- |
READ NEXT:
 Removal
REMOVAL
CAUTION / NOTICE / HINT
The necessary procedures (adjustment, calibration, initialization, or registration)
that must be performed after parts are removed and installed, or replaced during
Installation
INSTALLATION
CAUTION / NOTICE / HINT
NOTICE:
Immediately after installing the brake pads, the braking performance
may be reduced. Always perform a road test in a safe place while paying
Tire And Wheel
Removal
REMOVAL
PROCEDURE
1. REMOVE WHEEL ASSEMBLY
(a) Loosen the axle hub nuts approximately 90°.
(b) Lift up the vehicle and remove the axle hub nuts and wheel assembly.
Installation
INS
SEE MORE:
Engine Oil Temperature Sensor Circuit Short to Ground (P019511)
DESCRIPTION The engine oil temperature sensor replaces the oil temperature with electrical signals and outputs them to the ECM. DTC No. Detection Item DTC Detection Condition Trouble Area MIL Memory Note P019511 Engine Oil Temperature Sensor Circuit Short to Ground The engine
Precaution
PRECAUTION INITIALIZATION NOTICE: Make sure to perform the necessary procedures (adjustment, calibration, initialization, or registration) after parts related to the cable has been disconnected from the negative (-) battery terminal. Click here CHARGING SYSTEM PRECAUTION NOTICE:
Check that the
© 2016-2026 Copyright www.lexguide.net
