Lexus ES: Components
COMPONENTS
ILLUSTRATION
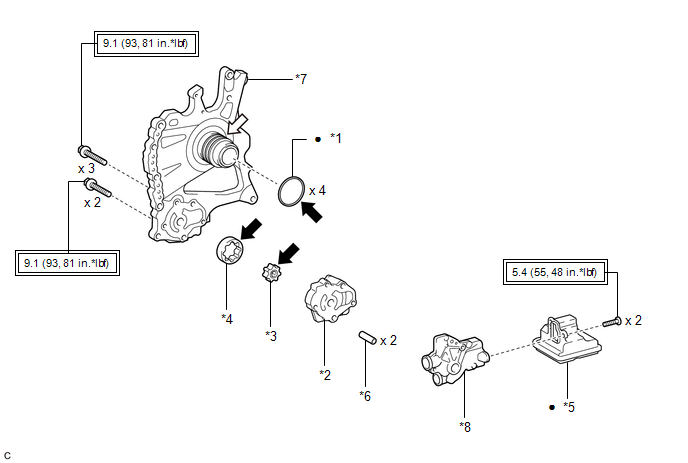
| *1 | CLUTCH DRUM OIL SEAL RING | *2 | FRONT OIL PUMP BODY |
| *3 | FRONT OIL PUMP DRIVE GEAR | *4 | FRONT OIL PUMP DRIVEN GEAR |
| *5 | OIL STRAINER ASSEMBLY | *6 | RING PIN |
| *7 | STATOR SHAFT ASSEMBLY | *8 | FRONT OIL PUMP COVER SUB-ASSEMBLY |
.png) | Tightening torque for "Major areas involving basic vehicle performance such as moving/turning/stopping": N*m (kgf*cm, ft.*lbf) | ● | Non-reusable part |
.png) | Toyota Genuine ATF WS | .png) | MP grease |
READ NEXT:
 Disassembly
DISASSEMBLY PROCEDURE 1. REMOVE CLUTCH DRUM OIL SEAL RING (a) Remove the 4 clutch drum oil seal rings from the stator shaft assembly. NOTICE: Do not expand the gap of the clutch drum oil seal rings
Inspection
INSPECTION PROCEDURE 1. INSPECT FRONT OIL PUMP ASSEMBLY (a) Install the oil pump drive shaft sub-assembly to the front oil pump assembly. NOTICE:
To avoid damaging the bush of the front oil pump as
Reassembly
REASSEMBLY PROCEDURE 1. INSTALL RING PIN (a) Install the 2 ring pins to the front oil pump cover sub-assembly. 2. INSTALL FRONT OIL PUMP BODY (a) Install the front oil pump body to t
SEE MORE:
Lost Communication with Blind Spot Monitor Slave Module (U0232)
DESCRIPTION This DTC is stored when the blind spot monitor sensor RH judges that there is a communication problem with the blind spot monitor sensor LH. DTC No. Detection Item DTC Detection Condition Trouble Area U0232 Lost Communication with Blind Spot Monitor Slave Module The blin
Problem Symptoms Table
PROBLEM SYMPTOMS TABLE HINT:
Use the table below to help determine the cause of problem symptoms. If multiple suspected areas are listed, the potential causes of the symptoms are listed in order of probability in the "Suspected Area" column of the table. Check each symptom by checking the suspect
© 2016-2026 Copyright www.lexguide.net
