Lexus ES: Components
COMPONENTS
ILLUSTRATION
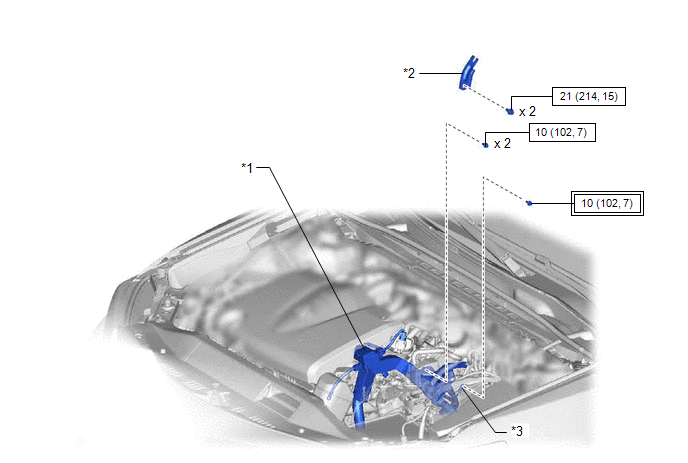
| *1 | ENGINE WIRE | *2 | NO. 2 SURGE TANK STAY |
| *3 | EARTH WIRE | - | - |
.png) | Tightening torque for "Major areas involving basic vehicle performance such as moving/turning/stopping": N*m (kgf*cm, ft.*lbf) | .png) | N*m (kgf*cm, ft.*lbf): Specified torque |
ILLUSTRATION
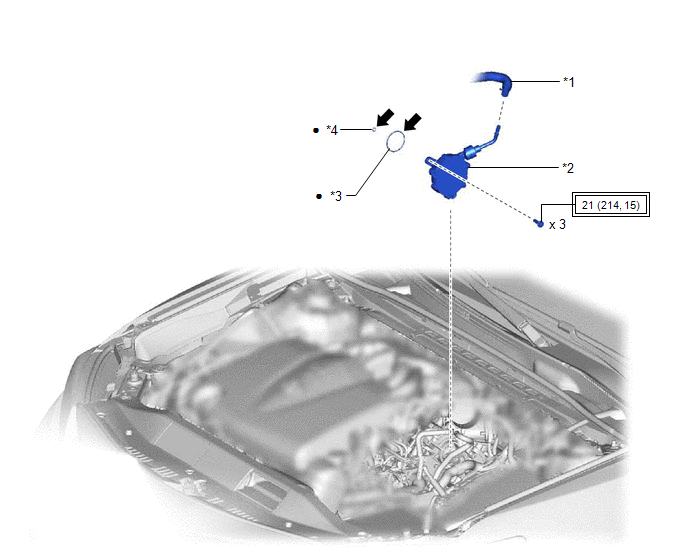
| *1 | AIR TUBE | *2 | VACUUM PUMP ASSEMBLY |
| *3 | NO. 2 O-RING | *4 | NO. 3 O-RING |
| | Tightening torque for "Major areas involving basic vehicle performance such as moving/turning/stopping": N*m (kgf*cm, ft.*lbf) | ● | Non-reusable part |
.png) | Engine oil | - | - |
ILLUSTRATION
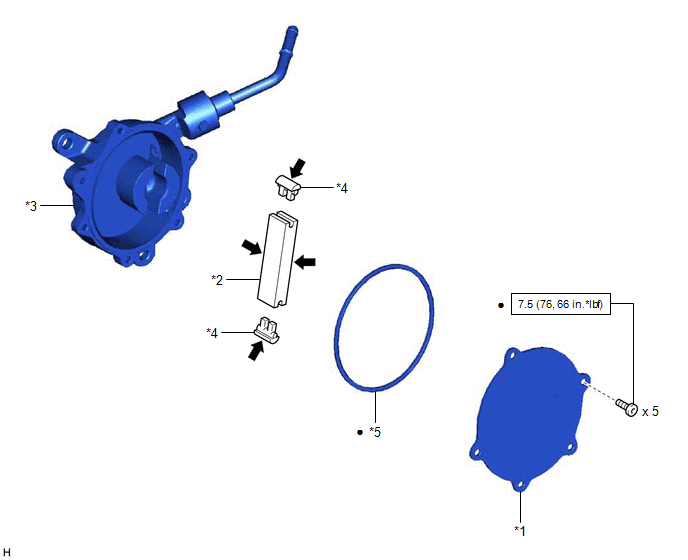
| *1 | END COVER | *2 | VACUUM PUMP VANE |
| *3 | VACUUM PUMP HOUSING | *4 | VACUUM PUMP VANE CAP |
| *5 | NO. 1 O-RING | - | - |
| | N*m (kgf*cm, ft.*lbf): Specified torque | ● | Non-reusable part |
| | Engine oil | - | - |
READ NEXT:
 Disassembly
DISASSEMBLY PROCEDURE 1. REMOVE END COVER (a) Using a T30 "TORX" socket wrench, remove the 5 screws and end cover. NOTICE:
Hold the pump so that the pump installation surface, fitting parts an
Inspection
INSPECTION PROCEDURE 1. INSPECT VACUUM PUMP VANE (a) Check that the vacuum pump vane or vacuum pump vane caps are not damaged or excessively worn. HINT: If the vacuum pump vane or vacuum pump vane
Installation
INSTALLATION PROCEDURE 1. INSTALL VACUUM PUMP ASSEMBLY (a) When using a new vacuum pump assembly: (1) Apply engine oil to the No. 2 O-ring and No. 3 O-ring which are installed to a new vacuum pump ass
SEE MORE:
Active Control Engine Mount System
DESCRIPTION LOCATION *1 Vacuum Switching Valve (for Active Control Engine Mount System) *2 Front Engine Mounting Insulator *3 Rear Engine Mounting Insulator - - The active control engine mount system decreases engine vibration at a low engine speed using the vacuum switching v
Removal
REMOVAL CAUTION / NOTICE / HINT The necessary procedures (adjustment, calibration, initialization, or registration) that must be performed after parts are removed and installed, or replaced during black out tape removal/installation are shown below. Necessary Procedure After Parts Removed/Installed/
© 2016-2026 Copyright www.lexguide.net
