Lexus ES: Components
COMPONENTS
ILLUSTRATION

| *1 | BRAKE MASTER CYLINDER O-RING | *2 | BRAKE MASTER CYLINDER SUB-ASSEMBLY |
| *3 | BRAKE LINE | *4 | CONNECTOR |
| *5 | BRAKE BOOSTER ASSEMBLY | - | - |
.png) | Tightening torque for "Major areas involving basic vehicle performance such as moving/turning/stopping" : N*m (kgf*cm, ft.*lbf) | * | For use with a union nut wrench |
| ● | Non-reusable part | - | - |
ILLUSTRATION
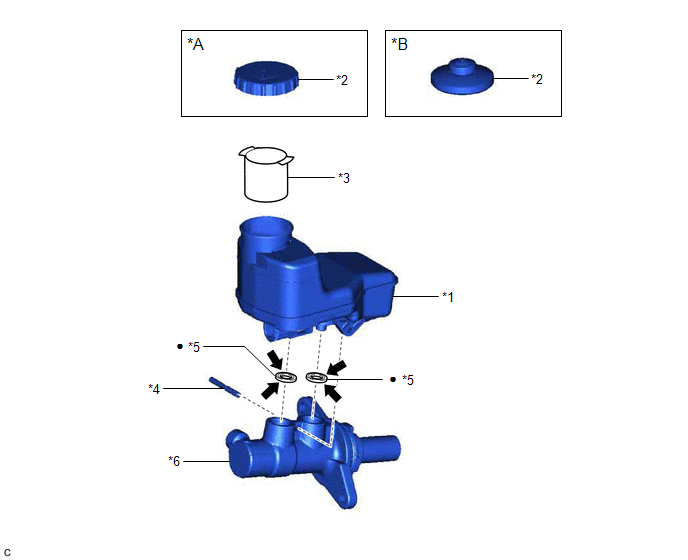
| *A | for TMC Made | *B | for TMMK Made |
| *1 | BRAKE MASTER CYLINDER RESERVOIR ASSEMBLY | *2 | BRAKE MASTER CYLINDER RESERVOIR FILLER CAP ASSEMBLY |
| *3 | BRAKE MASTER CYLINDER RESERVOIR STRAINER | *4 | BRAKE MASTER CYLINDER STRAIGHT PIN |
| *5 | MASTER CYLINDER RESERVOIR GROMMET | *6 | BRAKE MASTER CYLINDER BODY |
| ● | Non-reusable part | .png) | Lithium soap base glycol grease |
READ NEXT:
 Disassembly
DISASSEMBLY PROCEDURE 1. REMOVE BRAKE MASTER CYLINDER STRAIGHT PIN (a) Secure the brake master cylinder sub-assembly in a vise. NOTICE: Place aluminum plates on the vise to prevent damage to the brake
Inspection
INSPECTION PROCEDURE 1. INSPECT AND ADJUST BRAKE BOOSTER PUSH ROD NOTICE: Make the adjustment with no vacuum in the brake booster assembly. (Depress the brake pedal several times with the engine stopp
Installation
INSTALLATION PROCEDURE 1. INSPECT AND ADJUST BRAKE BOOSTER PUSH ROD Click here 2. INSTALL BRAKE MASTER CYLINDER O-RING (a) Install a new brake master cylinder O-ring to the brake master cylinder sub
SEE MORE:
Removal
REMOVAL CAUTION / NOTICE / HINT The necessary procedures (adjustment, calibration, initialization or registration) that must be performed after parts are removed and installed, or replaced during service plug grip removal/installation are shown below. Necessary Procedures After Parts Removed/Install
Installation
INSTALLATION CAUTION / NOTICE / HINT NOTICE: This procedure includes the installation of small-head bolts. Refer to Small-Head Bolts of Basic Repair Hint to identify the small-head bolts. Click here PROCEDURE 1. INSTALL CAMSHAFT TIMING OIL CONTROL VALVE ASSEMBLY (EXHAUST CAMSHAFT TIMING GEAR BOLT
© 2016-2026 Copyright www.lexguide.net
