Lexus ES: 2gr-fks Air Cleaner Filter Element
Components
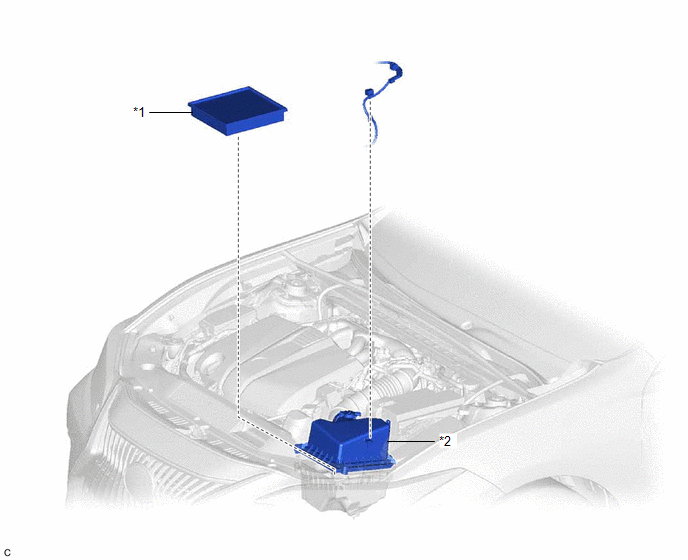
COMPONENTS
ILLUSTRATION
|
*1 |
AIR CLEANER CAP SUB-ASSEMBLY |
*2 |
AIR CLEANER FILTER ELEMENT SUB-ASSEMBLY |
Removal
REMOVAL
PROCEDURE
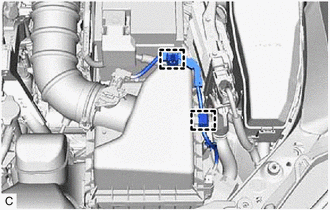
1. SEPARATE AIR CLEANER CAP SUB-ASSEMBLY
|
(a) Disengage the 2 wire harness clamps. |
|
|
(b) Disengage the 2 air cleaner cap clamps. |
|
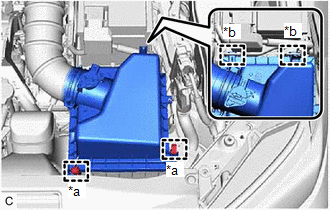
(c) Disengage the 2 guides to separate the air cleaner cap sub-assembly from the air cleaner case sub-assembly.
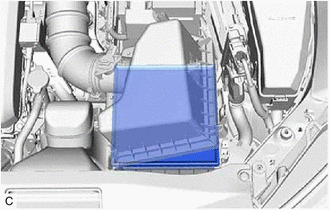
2. REMOVE AIR CLEANER FILTER ELEMENT SUB-ASSEMBLY
|
(a) Remove the air cleaner filter element sub-assembly from the air cleaner case sub-assembly. NOTICE: Do not allow foreign matter to enter the air cleaner cap sub-assembly and air cleaner case sub-assembly. |
|
3. INSPECT AIR CLEANER FILTER ELEMENT SUB-ASSEMBLY
HINT:
This procedure is only performed when the air cleaner filter element sub-assembly will be reused.
(a) Check whether the air cleaner filter element sub-assembly is dirty or clogged.
|
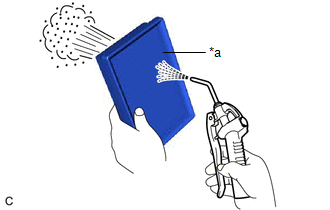
(b) If the air cleaner filter element sub-assembly is dirty or has foreign matter adhered to it, clean the air cleaner filter element sub-assembly with compressed air. NOTICE: When cleaning the air cleaner filter element sub-assembly, blow the compressed air from the intake downstream side (from the air cleaner cap sub-assembly side). HINT: If the air cleaner filter element sub-assembly is still extremely dirty after cleaning it, replace the air cleaner filter element sub-assembly with a new one. |
|
Installation
INSTALLATION
PROCEDURE
1. INSTALL AIR CLEANER FILTER ELEMENT SUB-ASSEMBLY
(a) Check that the inside of the air cleaner case sub-assembly does not have dirt or deposits, and clean them away if they are present.
(b) Install the air cleaner filter element sub-assembly to the air cleaner case sub-assembly.
2. INSTALL AIR CLEANER CAP SUB-ASSEMBLY
(a) Engage the 2 guides to install the air cleaner cap sub-assembly to the air cleaner case sub-assembly.
(b) Engage the 2 air cleaner cap clamps.
(c) Engage the 2 wire harness clamps.
READ NEXT:
 Components
COMPONENTS
ILLUSTRATION
*A
w/ Battery Insulator
-
-
*1
BATTERY
*2
NEGATIVE BATTERY TERMINAL
Removal
REMOVAL
CAUTION / NOTICE / HINT
The necessary procedures (adjustment, calibration, initialization or registration)
that must be performed after parts are removed and installed, or replaced battery
SEE MORE:
Camera Position Adjustment Incomplete (C1697)
DESCRIPTION This DTC is stored when the parking assist ECU judges that the camera initial setting has not been memorized (camera view adjustment is incomplete). DTC No. Detection Item DTC Detection Condition Trouble Area C1697 Camera Position Adjustment Incomplete Camera initial set
Cellular Phone Registration Failure
CAUTION / NOTICE / HINT NOTICE:
Depending on the parts that are replaced during vehicle inspection or maintenance, performing initialization, registration or calibration may be needed. Refer to Precaution for Audio and Visual System.
Click here
When replacing the radio receiver assembly, alw
