Lexus ES: Removal
REMOVAL
PROCEDURE
1. REMOVE INSTRUMENT PANEL FINISH PANEL END LH
Click here .gif)
2. REMOVE INSTRUMENT PANEL FINISH PANEL END RH
Click here
3. REMOVE CENTER INSTRUMENT CLUSTER FINISH PANEL SUB-ASSEMBLY
Click here
4. REMOVE SHIFT LEVER KNOB SUB-ASSEMBLY
for UA80E: Click here
for P710: Click here
5. REMOVE REAR UPPER CONSOLE PANEL SUB-ASSEMBLY
Click here
6. REMOVE REMOTE OPERATION CONTROLLER ASSEMBLY
(a) Remove the 4 screws and remote operation controller assembly as shown in the illustration.
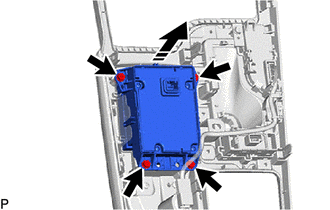
.png) | Remove in this Direction |
READ NEXT:
 Removal
REMOVAL PROCEDURE 1. REMOVE INSTRUMENT PANEL FINISH PANEL END LH Click here 2. REMOVE INSTRUMENT PANEL FINISH PANEL END RH Click here 3. REMOVE CENTER INSTRUMENT CLUSTER FINISH PANEL SUB-ASSEMBLY
SEE MORE:
Parking Support Brake function
(static objects)
If the sensors detect a static object, such as a wall, in the traveling
direction of
the vehicle and the system determines that a collision may occur due to the
vehicle suddenly moving forward due to an accidental accelerator pedal
operation,
the vehicle moving the unintended direction due to
Components
COMPONENTS ILLUSTRATION *A for Type A *B for Type B *1 LUGGAGE COMPARTMENT FLOOR MAT *2 LUGGAGE COMPARTMENT TRIM COVER RH *3 LUGGAGE COMPARTMENT TRIM INNER COVER RH *4 REAR FLOOR FINISH PLATE *5 LUGGAGE HOLD BELT STRIKER ASSEMBLY *6 ROPE HOOK *7 SPARE WH
© 2016-2026 Copyright www.lexguide.net
