Lexus ES: Removal
REMOVAL
CAUTION / NOTICE / HINT
HINT:
- Use the same procedure for the RH side and LH side.
- The following procedure is for the LH side.
PROCEDURE
1. REMOVE WASHER NOZZLE SUB-ASSEMBLY
(a) Using a screwdriver with its tip wrapped with protective tape, disengage the 2 claws as shown in the illustration to separate the washer nozzle sub-assembly.
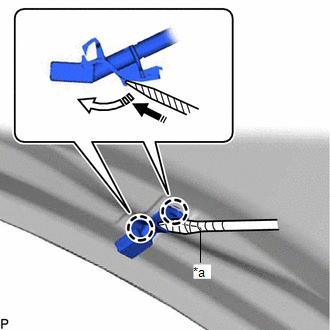
| *a | Protective Tape |
.png) | Remove in this Direction (1) |
.png) | Remove in this Direction (2) |
NOTICE:
Be careful not to damage the windshield glass.
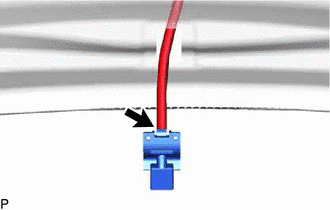
| (b) Disconnect the washer hose to remove the washer nozzle sub-assembly. NOTICE: Washer nozzle sub-assemblies cannot be reused. |
|
READ NEXT:
 Adjustment
ADJUSTMENT PROCEDURE 1. REMOVE WASHER NOZZLE SUB-ASSEMBLY Click here 2. ADJUST WASHER NOZZLE SUB-ASSEMBLY (a) Select a washer nozzle sub-assembly so the position the washer fluid hits the windshield
Installation
INSTALLATION CAUTION / NOTICE / HINT HINT:
Use the same procedure for the RH side and LH side.
The following procedure is for the LH side.
PROCEDURE 1. INSTALL WASHER NOZZLE SUB-ASSEMBLY (a) C
SEE MORE:
Components
COMPONENTS ILLUSTRATION *1 FUEL PUMP ASSEMBLY *2 FUEL PUMP PROTECTOR *3 NO. 1 FUEL PIPE SUB-ASSEMBLY *4 NO. 2 FUEL TUBE SUB-ASSEMBLY *5 FUEL PUMP LIFTER ASSEMBLY *6 FUEL PUMP LIFTER GUIDE *7 FUEL PUMP SPACER GASKET *8 FUEL TUBE SUB-ASSEMBLY *9 O-RING -
Lost Communication with Front Shade Module (B2346)
DESCRIPTION This DTC is stored when LIN communication between the sliding roof ECU (sliding roof drive gear assembly) and roof sunshade ECU (sliding roof drive gear assembly) stops for 10 seconds or more. DTC No. Detection Item DTC Detection Condition Trouble Area B2346 Lost Communica
© 2016-2026 Copyright www.lexguide.net
