Lexus ES: Adjustment
ADJUSTMENT
PROCEDURE
1. REMOVE WASHER NOZZLE SUB-ASSEMBLY
Click here .gif)
2. ADJUST WASHER NOZZLE SUB-ASSEMBLY
(a) Select a washer nozzle sub-assembly so the position the washer fluid hits the windshield will be within the standard area. Replace the washer nozzle sub-assembly with the selected one.
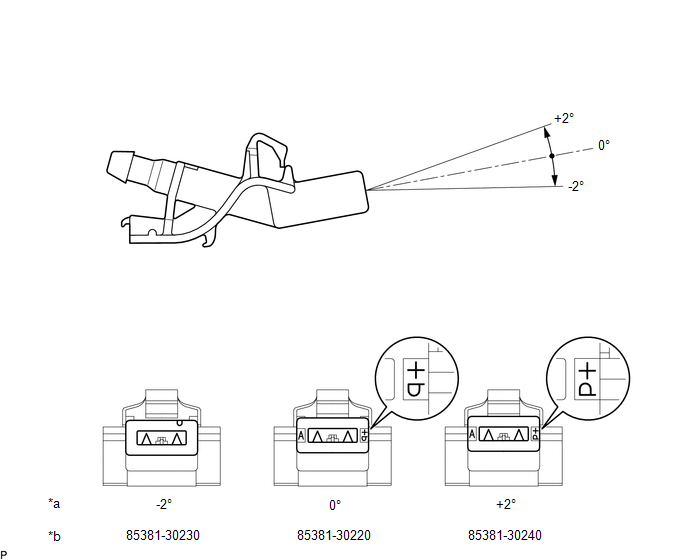
| *a | Washer Fluid Spray Angle | *b | Part Number |
3. INSTALL WASHER NOZZLE SUB-ASSEMBLY
Click here
READ NEXT:
 Installation
INSTALLATION CAUTION / NOTICE / HINT HINT:
Use the same procedure for the RH side and LH side.
The following procedure is for the LH side.
PROCEDURE 1. INSTALL WASHER NOZZLE SUB-ASSEMBLY (a) C
Precaution
PRECAUTION PRECAUTION FOR DISCONNECTING CABLE FROM NEGATIVE BATTERY TERMINAL NOTICE: When disconnecting the cable from the negative (-) battery terminal, initialize the following systems after the cab
SEE MORE:
Drive Motor "A" Position Sensor Circuit "A" Circuit Open (P0C5013,P0C501F,P0C5A13,P0C5A1F)
DTC SUMMARY MALFUNCTION DESCRIPTION These DTCs indicate that the resolver output signal is abnormal. The cause of this malfunction may be one of the following: Area Main Malfunction Description Inverter low-voltage circuit The connectors are not connected properly Hybrid Vehicle Trans
Installation
INSTALLATION CAUTION / NOTICE / HINT HINT:
Use the same procedure for the RH side and LH side.
The following procedure is for the LH side.
PROCEDURE 1. INSTALL FRONT DOOR FRONT LOWER FRAME UPPER COVER (a) Engage the 2 guides. (b) Install the front door front lower frame upper cover with the
© 2016-2026 Copyright www.lexguide.net
