Lexus ES: Removal
REMOVAL
CAUTION / NOTICE / HINT
HINT:
- Use the same procedure for the RH side and LH side.
- The following procedure is for the LH side.
PROCEDURE
1. REMOVE NO. 2 DOOR TRIM PAD
Click here .gif)
2. REMOVE MULTIPLEX NETWORK MASTER SWITCH ASSEMBLY WITH FRONT DOOR UPPER ARMREST BASE PANEL (for Driver Side)
Click here
3. REMOVE POWER WINDOW REGULATOR SWITCH ASSEMBLY WITH FRONT DOOR UPPER ARMREST BASE PANEL (for Front Passenger Side)
Click here
4. REMOVE COURTESY LIGHT ASSEMBLY
Click here
5. REMOVE FRONT DOOR TRIM BOARD SUB-ASSEMBLY
Click here
6. REMOVE OUTER MIRROR CONTROL ECU ASSEMBLY
| (a) Disconnect the 2 connectors. |
|
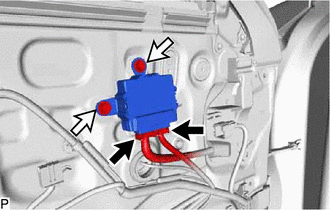
(b) Remove the 2 screws and outer mirror control ECU assembly.
READ NEXT:
 Installation
INSTALLATION CAUTION / NOTICE / HINT HINT:
Use the same procedure for the RH side and LH side.
The following procedure is for the LH side.
PROCEDURE 1. INSTALL OUTER MIRROR CONTROL ECU ASSEMBL
Components
COMPONENTS ILLUSTRATION *1 MULTIPLEX NETWORK MASTER SWITCH ASSEMBLY WITH FRONT DOOR UPPER ARMREST BASE PANEL *2 OUTER MIRROR SWITCH ASSEMBLY
SEE MORE:
Installation
INSTALLATION PROCEDURE 1. INSTALL STOP LIGHT SWITCH ASSEMBLY (a) Insert the stop light switch assembly until the threaded sleeve hits the pedal as shown in the illustration. *1 Stop Light Switch Mounting Adjuster Insert in this Direction NOTICE: When inserting the stop light switch a
Hybrid/EV Battery Current Sensor for Driving Control Voltage Out of Range (P1C9F1C)
DESCRIPTION Refer to the description for DTC P0ABF11. Click here DTC No. Detection Item DTC Detection Condition Trouble Area MIL Warning Indicate P1C9F1C Hybrid/EV Battery Current Sensor for Driving Control Voltage Out of Range The difference between IBA and IB0 exceeds the th
© 2016-2026 Copyright www.lexguide.net
