Lexus ES: Removal
REMOVAL
CAUTION / NOTICE / HINT
HINT:
- Use the same procedure for the RH side and LH side.
- The following procedure is for the LH side.
PROCEDURE
1. REMOVE LUGGAGE LOCK CONTROL CABLE PLATE
Click here .gif)
2. REMOVE SWITCH BEZEL (w/ Power Trunk Lid System)
Click here
3. REMOVE LUGGAGE COMPARTMENT DOOR COVER
Click here
4. REMOVE REAR LIGHT ASSEMBLY
| (a) Disconnect the connector. |
|
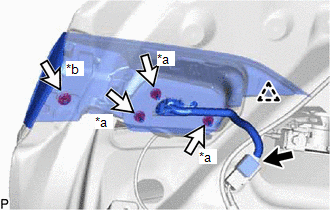
(b) Remove the 3 nuts and cap nut.
(c) Disengage the clip to remove the rear light assembly.
READ NEXT:
 Disassembly
DISASSEMBLY CAUTION / NOTICE / HINT HINT:
Use the same procedure for the RH side and LH side.
The following procedure is for the LH side.
PROCEDURE 1. REMOVE REAR LIGHT GASKET (a) Remove th
Inspection
INSPECTION PROCEDURE 1. INSPECT REAR LIGHT ASSEMBLY LH *a Component without harness connected (Rear Light Assembly LH) (a) Apply auxiliary battery voltage to the rear light assembly LH and ch
Reassembly
REASSEMBLY CAUTION / NOTICE / HINT HINT:
Use the same procedure for the RH side and LH side.
The following procedure is for the LH side.
PROCEDURE 1. INSTALL REAR LIGHT PROTECTOR (a) Instal
SEE MORE:
Inspection
INSPECTION PROCEDURE 1. INSPECT FRONT NO. 1 SPEAKER ASSEMBLY (a) With the speaker installed, check that there is no looseness or other abnormalities. (b) Check that there is no foreign matter in the speaker, no tears on the speaker cone or other abnormalities. (c) Measure the resistance of the sp
DC/DC Converter Current Sensor Signal Stuck In Range (P0E512A)
DTC SUMMARY MALFUNCTION DESCRIPTION This DTC is stored if the value of the reactor current sensor does not change. The cause of this malfunction may be one of the following: Area Main Malfunction Description Inverter
Inverter internal circuit malfunction
Malfunction in ECU that contr
© 2016-2026 Copyright www.lexguide.net
