Lexus ES: Removal
REMOVAL
CAUTION / NOTICE / HINT
HINT:
- Use the same procedure for the RH side and LH side.
- The following procedure is for the LH side.
PROCEDURE
1. REMOVE NO. 2 DOOR TRIM PAD
Click here .gif)
2. REMOVE MULTIPLEX NETWORK MASTER SWITCH ASSEMBLY WITH FRONT DOOR UPPER ARMREST BASE PANEL (for Driver Side)
Click here
3. REMOVE POWER WINDOW REGULATOR SWITCH ASSEMBLY WITH FRONT DOOR UPPER ARMREST BASE PANEL (for Front Passenger Side)
Click here
4. REMOVE COURTESY LIGHT ASSEMBLY
Click here
5. REMOVE FRONT DOOR TRIM BOARD SUB-ASSEMBLY
Click here
6. REMOVE FRONT DOOR LOWER FRAME BRACKET GARNISH
Click here
7. REMOVE FRONT DOOR TRIM BRACKET
Click here
8. REMOVE FRONT DOOR FRONT LOWER FRAME UPPER COVER
| (a) Remove the nut. |
|
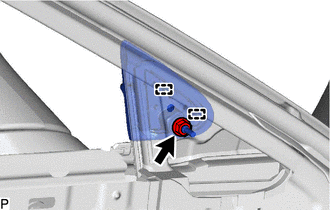
(b) Disengage the 2 guides to remove the front door front lower frame upper cover.
READ NEXT:
 Installation
INSTALLATION CAUTION / NOTICE / HINT HINT:
Use the same procedure for the RH side and LH side.
The following procedure is for the LH side.
PROCEDURE 1. INSTALL FRONT DOOR FRONT LOWER FRAME UPP
Components
COMPONENTS ILLUSTRATION *1 FRONT RADIATOR SIDE AIR GUIDE PLATE LH *2 FRONT RADIATOR SIDE AIR GUIDE PLATE RH *3 RADIATOR SHUTTER SUB-ASSEMBLY *4 THERMISTOR ASSEMBLY N*m (kgf*
SEE MORE:
Inspection
INSPECTION PROCEDURE 1. INSPECT GENERATOR BRUSH HOLDER ASSEMBLY (a) Using a vernier caliper, measure the length of the exposed brushes. Standard Exposed Brush Length: 9.5 to 11.5 mm (0.374 to 0.453 in.) Minimum Exposed Brush Length: 4.5 mm (0.177 in.) If the brush length is less than the minimu
Drive Motor "A" Temperature Sensor Voltage Out of Range (P0A2A1C,P0A2A1F)
DTC SUMMARY MALFUNCTION DESCRIPTION These DTCs are stored when the motor temperature sensor output is abnormal. The cause of this malfunction may be one of the following: Motor temperature sensor malfunction
Internal motor temperature sensor malfunction
Open or short in motor temperature sensor
© 2016-2026 Copyright www.lexguide.net
