Lexus ES: Removal
REMOVAL
PROCEDURE
1. REMOVE NO. 1 INSTRUMENT PANEL UNDER COVER SUB-ASSEMBLY
Click here .gif)
2. REMOVE STOP LIGHT SWITCH ASSEMBLY
| (a) Disconnect the connector. |
|
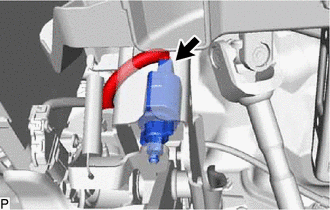
(b) Turn the stop light switch assembly counterclockwise and remove it.
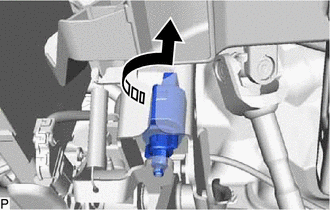
.png) | Remove in this Direction |
READ NEXT:
 Installation
INSTALLATION PROCEDURE 1. INSTALL STOP LIGHT SWITCH ASSEMBLY (a) Insert the stop light switch assembly until the threaded sleeve hits the pedal as shown in the illustration. *1 Stop Light Switch
Components
COMPONENTS ILLUSTRATION *A for Power Tilt and Power Telescopic Steering Column - - *1 STEERING WHEEL SWITCH HOUSING *2 TILT AND TELESCOPIC SWITCH *3 TURN SIGNAL SWITCH *4
SEE MORE:
Ignition Coil "A" Circuit Open (P035113-P035613)
DESCRIPTION HINT:
These DTCs indicate malfunctions relating to the primary circuit.
If DTC P035113 is output, check the No. 1 ignition coil assembly circuit.
If DTC P035213 is output, check the No. 2 ignition coil assembly circuit.
If DTC P035313 is output, check the No. 3 ignition coil ass
Open in B Power Line (B242F)
DESCRIPTION The headlight ECU sub-assembly operates using the power source voltage input from the IG terminal and ECUB terminal. The power source voltage of the ECUB terminal is supplied when the main body ECU (multiplex network body ECU) turns the ECUB power supply relay (H-LP LH relay and H-LP RH
© 2016-2026 Copyright www.lexguide.net
