Lexus ES: Removal
REMOVAL
CAUTION / NOTICE / HINT
HINT:
- Use the same procedure for the RH side and LH side.
- The following procedure is for the LH side.
PROCEDURE
1. REMOVE REAR POWER WINDOW REGULATOR SWITCH ASSEMBLY WITH REAR DOOR UPPER ARMREST BASE PANEL
Click here .gif)
2. REMOVE REAR DOOR TRIM UPPER PAD
Click here
3. REMOVE COURTESY LIGHT ASSEMBLY
Click here
4. REMOVE REAR DOOR TRIM BOARD SUB-ASSEMBLY
Click here
5. REMOVE REAR SPEAKER ASSEMBLY
NOTICE:
Do not touch the speaker cone.
(a) w/ Sub Wire Harness:
| (1) Disconnect the connector. |
|
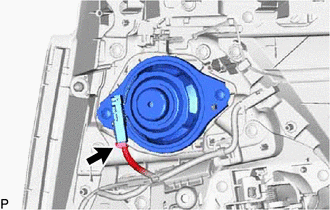
| (b) Remove the 2 screws. |
|
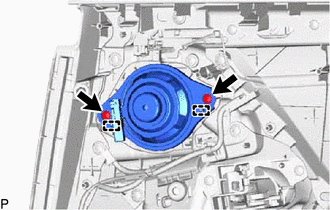
(c) Disengage the 2 guides to remove the rear speaker assembly.
READ NEXT:
 Components
COMPONENTS ILLUSTRATION *A for HV Model *B for Gasoline Model *1 REAR DOOR SCUFF PLATE LH *2 REAR DOOR SCUFF PLATE RH *3 REAR SEAT SIDE GARNISH LH *4 REAR SEAT SIDE GARNI
Inspection
INSPECTION PROCEDURE 1. INSPECT SPEAKER ASSEMBLY WITH BRACKET (a) With the speaker installed, check that there is no looseness or other abnormalities. (b) Check that there is no foreign matter in the
SEE MORE:
Utility
UTILITY NOTICE:
When replacing the millimeter wave radar sensor assembly, always replace it with a new one. If a millimeter wave radar sensor assembly which was installed to another vehicle is used, the information stored in the millimeter wave radar sensor assembly will not match the information
How To Proceed With Troubleshooting
CAUTION / NOTICE / HINT HINT:
Use the following procedure to troubleshoot the sliding roof system.
*: Use the Techstream.
PROCEDURE 1. VEHICLE BROUGHT TO WORKSHOP
NEXT 2. CUSTOMER PROBLEM ANALYSIS HINT:
In troubleshooting, confirm that the problem sympto
© 2016-2026 Copyright www.lexguide.net
