Lexus ES: Inspection
INSPECTION
PROCEDURE
1. INSPECT SPEAKER ASSEMBLY WITH BRACKET
(a) With the speaker installed, check that there is no looseness or other abnormalities.
(b) Check that there is no foreign matter in the speaker, no tears on the speaker cone or other abnormalities.
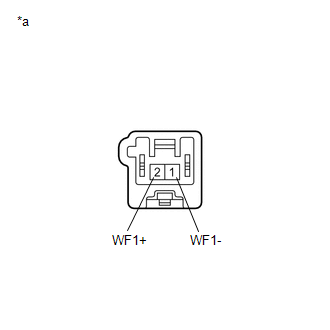
| (c) Measure the resistance of the speaker. Standard Resistance: for 10 Speakers
If the result is not as specified, replace the speaker. |
|
READ NEXT:
 Installation
INSTALLATION PROCEDURE 1. INSTALL SPEAKER ASSEMBLY WITH BRACKET NOTICE: Do not touch the speaker cone. (a) Install the speaker assembly with bracket with the 4 bolts. Torque: 8.0 N·m {82 kgf·cm,
Removal
REMOVAL CAUTION / NOTICE / HINT The necessary procedures (adjustment, calibration, initialization, or registration) that must be performed after parts are removed and installed, or replaced during spe
SEE MORE:
ECM Power Source Circuit
DESCRIPTION When the engine switch is turned on (IG), the battery voltage is applied to the IGSW terminal of the ECM. The output signal from the MREL terminal of the ECM causes a current to flow to the coil of the EFI-MAIN NO. 1 relay, closing the contacts and supplying power to terminals +B and +B2
Software Incompatibility with Cruise Control Module Invalid/Incompatible Software Component (U030557)
DESCRIPTION The millimeter wave radar sensor assembly receives vehicle information from the forward recognition camera via CAN communication. If the vehicle information stored in the forward recognition camera differs from that stored in the millimeter wave radar sensor assembly, the millimeter wave
© 2016-2026 Copyright www.lexguide.net
